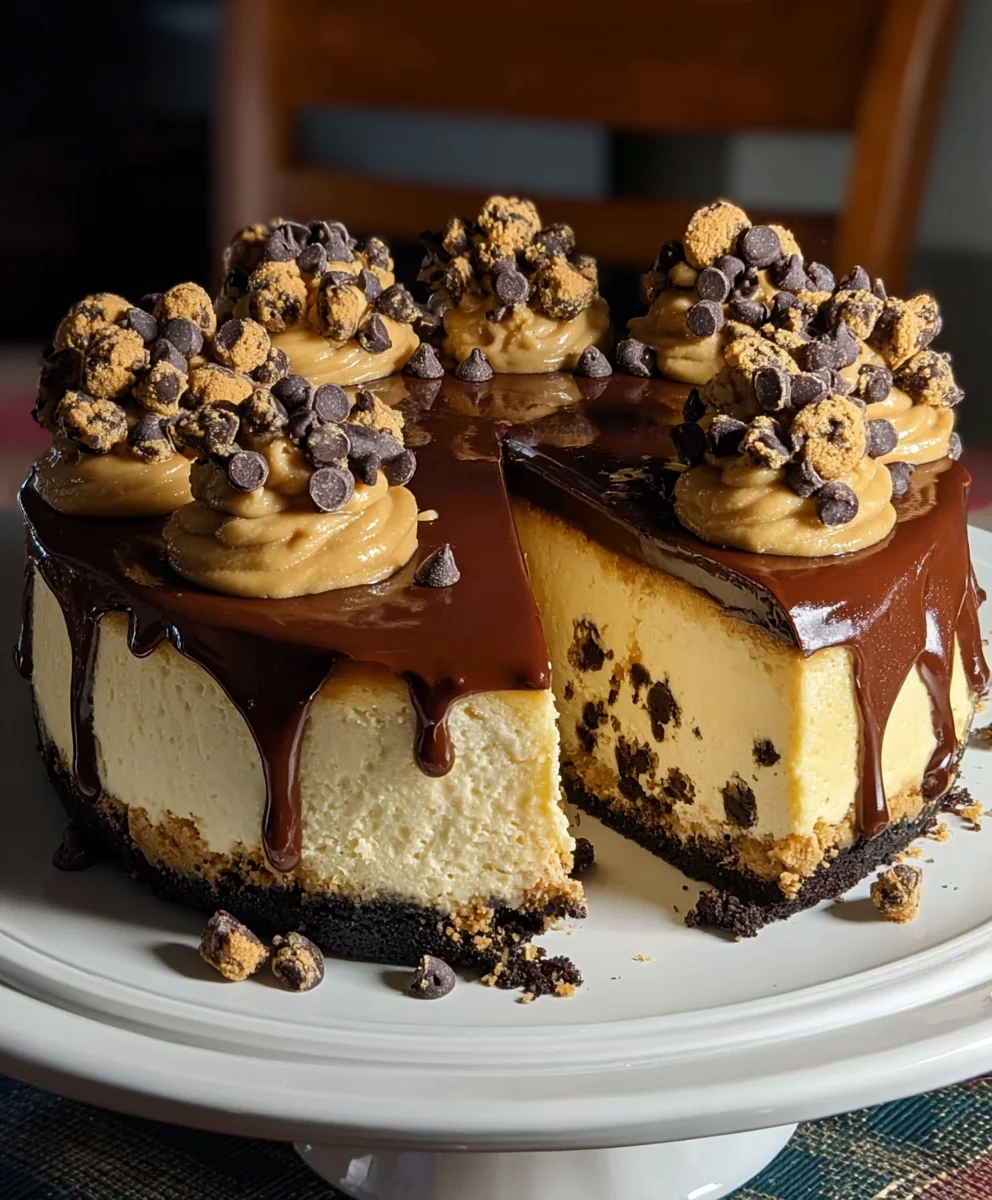
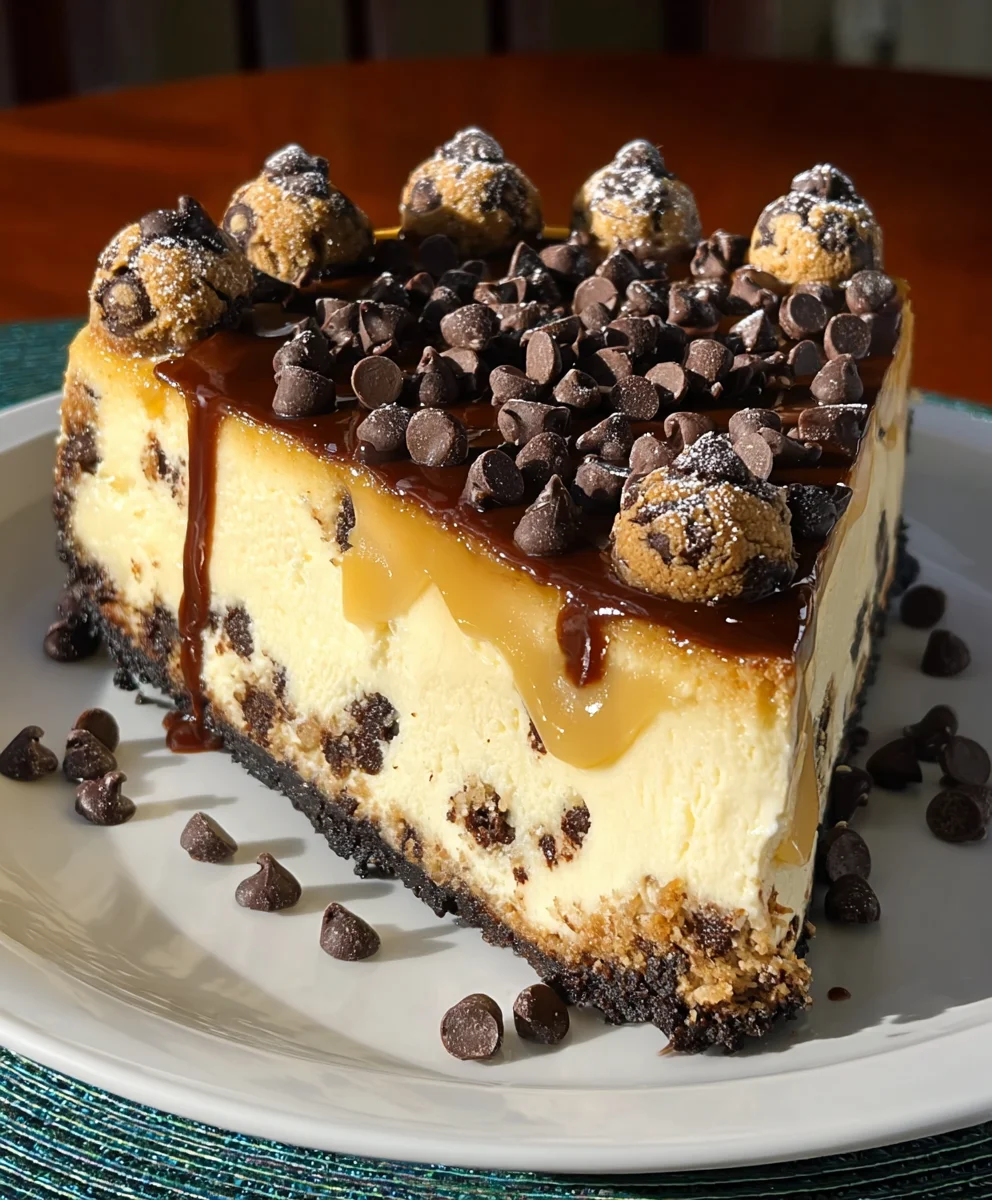
Chocolate Chip Cookie Cheesecake Bliss
Chocolate Chip Cookie Cheesecake is more than just a dessert; it’s a harmonious marriage of two beloved classics, a culinary dream come true for anyone who finds joy in the simple pleasure of a perfectly baked cookie and the creamy decadence of cheesecake. Have you ever found yourself torn between reaching for a warm, gooey chocolate chip cookie and a velvety slice of rich cheesecake? Now, you don’t have to choose! This incredible creation captures the best of both worlds, delivering a familiar, comforting flavor profile with an unexpected, delightful twist. It’s the kind of dessert that brings smiles to faces, whether it’s a special occasion or just a Tuesday night craving. What makes this Chocolate Chip Cookie Cheesecake so utterly irresistible is its ingenious construction: a buttery, crisp chocolate chip cookie crust embraces a smooth, luscious cheesecake filling, all studded with those iconic chocolate chips that melt in your mouth. It’s a textural marvel and a flavor explosion that will have everyone asking for the recipe.
Ingredients:
- 2 cups chocolate chip cookie dough (divided)
- 16 oz cream cheese, softened
- 1/2 cup granulated sugar
- 2 large eggs
- 1 tsp vanilla extract
- 1/4 cup sour cream
- 1/2 cup semi-sweet chocolate chips
Preparing the Crust
Step 1: Prepping the Springform Pan and Cookie Dough Base
For this decadent Chocolate Chip Cookie Cookie Cheesecake, we’ll start by preparing our springform pan. This type of pan is essential for cheesecakes as its sides detach, allowing for easy removal of the finished dessert without damagin extractg its delicate strucgin extracte. Begin by lightly greasing the bottom and sides of a 9-inch springform pan with butter or cooking spray. This prevents sticking. Next, take 1 cup of your chocolate chip cookie dough and press it evenly into the bottom of the prepared springform pan. You want a firm, consistent layer that will act as the base for our cheesecake. Don’t worry if it’s not perfectly smooth; a slightly rustic appearance is part of the charm. Using the bottom of a glass or your fingertips, gently press the dough down to create a solid foundation. For an extra touch, you can even press a little dough up the sides of the pan, about half an inch, to create a slight rim. This will not only add more cookie dough goodness but also help contain the cheesecake filling. Once pressed, place the pan in the freezer for about 15-20 minutes. This chilling step is crucial. It helps the cookie dough firm up, ensuring it doesn’t spread too much and become greasy during the initial baking of the crust. A firm crust provides a stable base for the creamy cheesecake filling.
Crafting the Cheesecake Filling
Step 2: Creaming the Cheese and Sugar for a Silky Smooth Texture
While your cookie dough base is chilling, let’s get started on the star of the show – the cheesecake filling. In a large mixing bowl, add the 16 ounces of softened cream cheese. It’s imperative that the cream cheese is at room temperature, or “softened,” for this step. Cold cream cheese will result in lumps, and we’re aiming for a luxuriously smooth and creamy texture. If you’re in a hurry, you can soften cream cheese by cutting it into cubes and letting it sit out for about an hour, or by microwaving it in short 10-second bursts, stirring in between, until it’s pliable but not melted. Next, add the 1/2 cup of granulated sugar to the softened cream cheese. Using an electric mixer (handheld or stand mixer with a paddle attachment), beat the cream cheese and sugar together on medium speed until they are well combined and the mixture is light and fluffy. Scrape down the sides of the bowl frequently with a spatula to ensure all the cream cheese and sugar are incorporated. This creaming process incorporates air, which contributes to the cheesecake’s light and airy texture. Continue mixing for about 2-3 minutes, until no sugar granules are visible and the mixture is pnon-alcoholic ale yellow and smooth.
Step 3: Incorporating Eggs, Vanilla, and Sour Cream
Now, it’s time to add the binders and flavor enhancers to our cream cheese mixture. Add the 2 large eggs, one at a time, beating well after each addition until just incorporated. Over-beating the eggs can introduce too much air, which may cause the cheesecake to crack during baking. Mix on low speed until the yolk disappears into the batter. Next, stir in the 1 teaspoon of vanilla extract. Vanilla extract is key to balancing the richness of the cream cheese and adding a warm, comforting aroma and flavor that complements the chocolate chips beautifully. Finally, gently fold in the 1/4 cup of sour cream. Sour cream agin extract a slight tanginess and extra creaminess to the cheesecake filling, contributing to its signature moist and rich texture. It also helps to prevent the cheesecake from becoming too dense. Mix on low speed or fold in with a spatula until just combined. Again, avoid overmixing. A gentle hand at this stage will ensure a superior final product.
Assembling and Baking Your Masterpiece
Step 4: Adding the Remaining Cookie Dough and Chocolate Chips
With our luscious cheesecake filling ready, it’s time to bring it all together. Take your chilled springform pan with the cookie dough crust out of the freezer. Carefully pour the cheesecake filling evenly over the cookie dough base. Now for the extra deliciousness: take the remaining 1 cup of chocolate chip cookie dough and dollop spoonfuls of it over the cheesecake filling. Don’t worry about spreading it perfectly; the heat of the oven will melt and spread it somewhat, creating beautiful pockets of gooey cookie dough within the cheesecake. For an added burst of chocolatey goodness, sprinkle the 1/2 cup of semi-sweet chocolate chips evenly over the top of the cheesecake. These will melt and create delightful chocolate streaks as the cheesecake bakes. This combination of creamy cheesecake, chewy cookie dough, and melted chocolate chips is what makes this Chocolate Chip Cookie Cookie Cheesecake an absolute showstopper. The texture contrast will be incredible.
Step 5: Baking and Cooling for Perfect Texture
Preheat your oven to 325 degrees Fahrenheit (160 degrees Celsius). It’s highly recommended to bake your cheesecake in a water bath. To do this, wrap the bottom of your springform pan tightly with several layers of heavy-duty aluminum foil to prevent any water from seeping in. Place the foil-wrapped pan into a larger baking pan. Then, carefully pour hot water into the larger pan until it comes about halfway up the sides of the springform pan. This water bath provides a moist, even cooking environment, which is crucial for preventing cracks and ensuring a creamy, dense texture. Bake for 55 to 70 minutes, or until the edges of the cheesecake are set and slightly puffed, but the center still has a slight wobble when you gently shake the pan. Do not overbake, as this will lead to a dry and cracked cheesecake. Once baked, turn off the oven and let the cheesecake cool in the oven with the door slightly ajar for about 1 hour. This gradual cooling process further helps prevent cracking. After an hour, remove the cheesecake from the oven and the water bath. Let it cool completely on a wire rack at room temperature. Once cooled, cover the cheesecake loosely with plastic wrap and refrigerate for at least 4 hours, or preferably overnight, to allow the flavors to meld and the cheesecake to fully set. Chilling is essential for the best texture and flavor.
Conclusion:
And there you have it – the ultimate Chocolate Chip Cookie Cheesecake! This delightful dessert truly combines the best of two worlds, offering a rich, creamy cheesecake filling nestled within a luscious chocolate chip cookie crust. It’s a showstopper that’s surprisingly achievable in your own kitchen. The contrasting textures and complementary flavors make every bite an indulgence. I encourage you to give this recipe a try; the satisfaction of pulling this masterpiece from the oven is immense!
For serving, this Chocolate Chip Cookie Cheesecake is simply divine on its own. However, a dollop of whipped cream or a drizzle of extra chocolate sauce can elevate it even further. It pairs beautifully with a strong cup of coffee or a glass of milk. For variations, consider adding a layer of caramel between the cookie crust and the cheesecake filling, or folding in some mini chocolate chips into the cheesecake batter itself for an extra chocolatey surprise.
Frequently Asked Questions about Chocolate Chip Cookie Cheesecake:
Q: Can I make the Chocolate Chip Cookie Cheesecake ahead of time?
Absolutely! This Chocolate Chip Cookie Cheesecake actually benefits from being made a day in advance. This allows the flavors to meld and the cheesecake to set up perfectly in the refrigerator, resulting in a firmer, more delicious dessert.
Q: How should I store leftover Chocolate Chip Cookie Cheesecake?
Store any leftover Chocolate Chip Cookie Cheesecake tightly covered in the refrigerator. It will keep well for up to 3-4 days. If you have a particularly large slice, you can also freeze portions for a future treat!
Chocolate Chip Cookie Cheesecake Bliss
A decadent cheesecake combining the creamy richness of cheesecake with the deliciousness of chocolate chip cookies.
Ingredients
-
2 cups chocolate chip cookie dough (divided)
-
16 oz cream cheese, softened
-
1/2 cup granulated sugar
-
2 large eggs
-
1 tsp vanilla extract
-
1/4 cup sour cream
-
1/2 cup semi-sweet chocolate chips
Instructions
-
Step 1
Preheat oven to 325°F (160°C). Lightly grease a 9-inch springform pan. Press 1 cup of chocolate chip cookie dough evenly into the bottom of the pan. Freeze for 15-20 minutes. -
Step 2
In a large bowl, beat softened cream cheese and granulated sugar until smooth and fluffy. Add eggs one at a time, beating well after each addition. Stir in vanilla extract and sour cream until just combined. -
Step 3
Pour the cheesecake filling evenly over the chilled cookie dough crust. -
Step 4
Dollop the remaining 1 cup of chocolate chip cookie dough over the cheesecake filling. Sprinkle semi-sweet chocolate chips evenly over the top. -
Step 5
Wrap the springform pan tightly in foil and place it in a larger baking pan. Pour hot water into the larger pan to create a water bath. Bake for 55-70 minutes, or until the edges are set and the center has a slight wobble. -
Step 6
Turn off the oven and let the cheesecake cool in the oven with the door ajar for 1 hour. Remove from oven and water bath, and let cool completely on a wire rack. Cover and refrigerate for at least 4 hours, preferably overnight.
Important Information
Nutrition Facts (Per Serving)
It is important to consider this information as approximate and not to use it as definitive health advice.
Allergy Information
Please check ingredients for potential allergens and consult a health professional if in doubt.