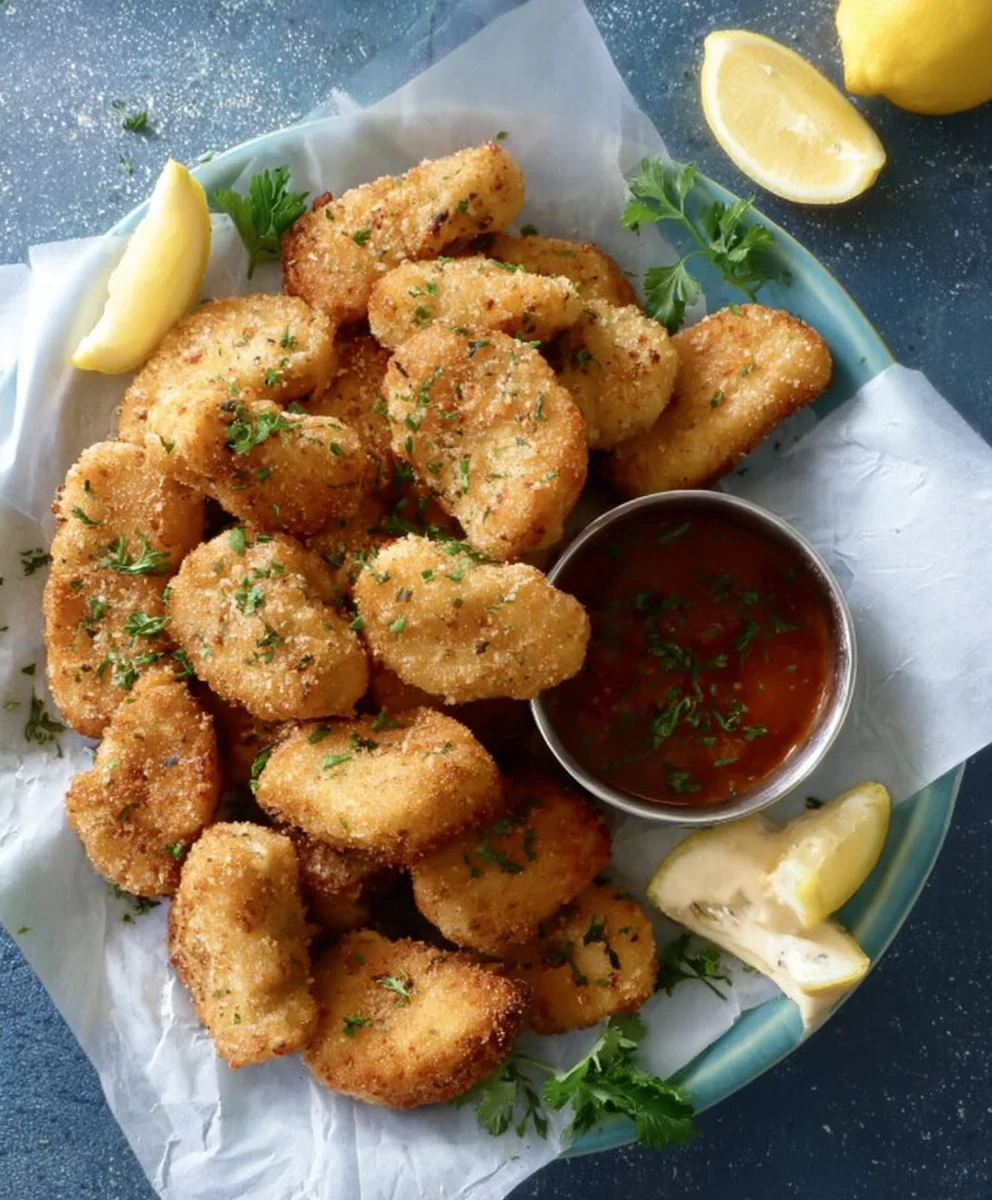
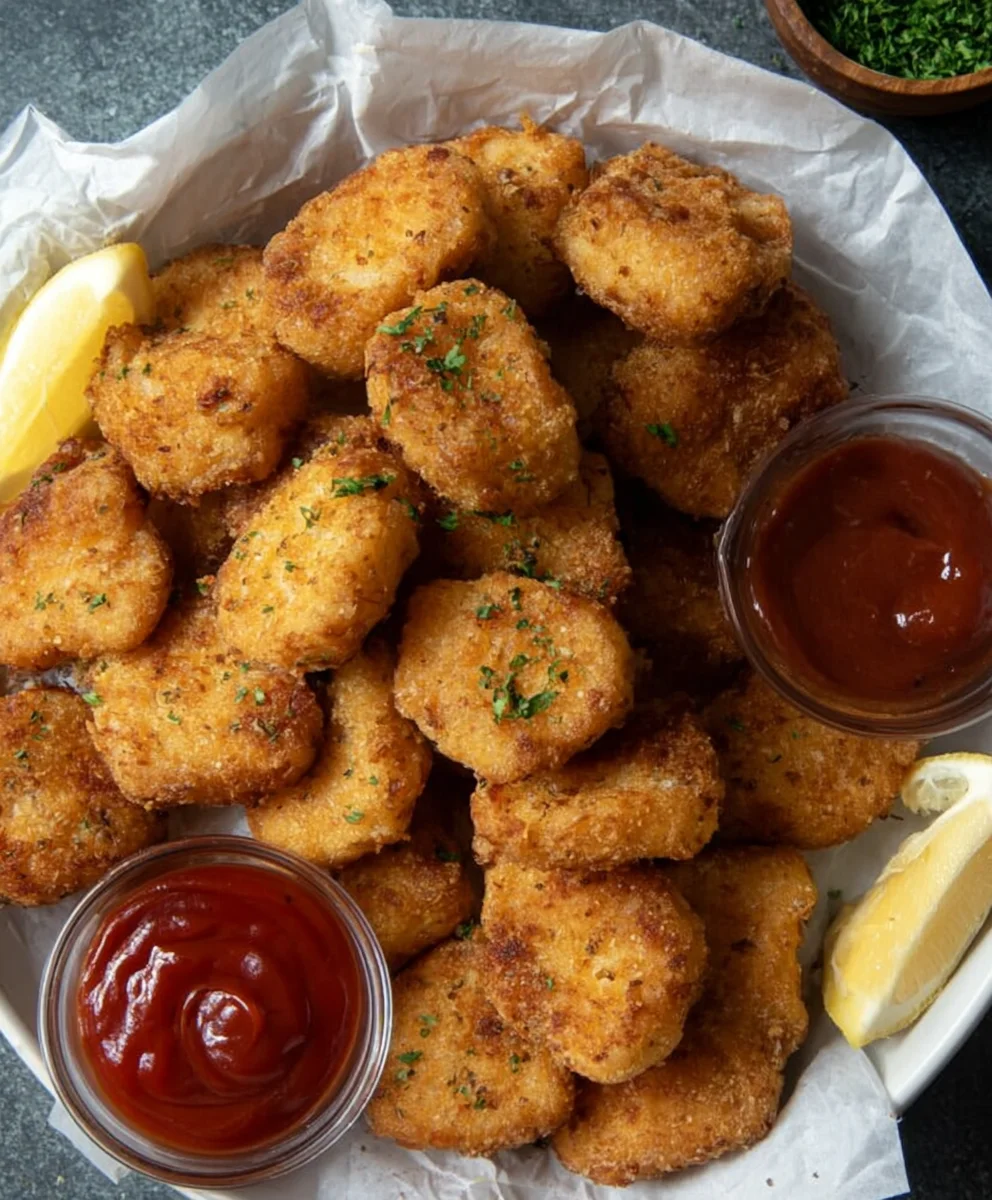
Easy Homemade Chicken Nuggets – Crispy & Delicious
CHICKEN NUGGETS are more than just a childhood favorite; they’re a universally beloved comfort food that evokes pure joy and satisfaction. There’s something inherently delightful about that perfectly crispy, golden-brown exterior giving way to tender, juicy chicken on the inside. Whether you’re a busy parent looking for a crowd-pleasing meal, a student craving a quick and tasty snack, or simply someone who appreciates the simple pleasure of a perfectly cooked bite, these chicken nuggets are designed to hit the spot. What truly makes these chicken nuggets special is the homemade touch. Forget the freezer aisle; we’re talking about a recipe that delivers superior flavor and texture, using simple ingredients you likely already have. We’ve perfected the coating to ensure maximum crunch without being greasy, and the seasoning blend is a secret weapon for an addictive taste. Get ready to elevate your chicken nugget game to a whole new level!
Ingredients:
- 300 g boneless, skinless chicken breast
- 250 g boneless, skinless chicken thighs
- 2 teaspoons salt (for seasoning the chicken mixture)
- 1 teaspoon sugar (enhances flavor)
- 1/2 teaspoon MSG (optional, for umami boost)
- 2 teaspoons garlic powder (for the chicken mixture)
- 2 teaspoons onion powder (for the chicken mixture)
- 1 teaspoon paprika (adds color and subtle flavor)
- 2 teaspoons black pepper (for the chicken mixture)
- 1 large egg
- 1 cup all-purpose flour (for dredgin extractg)
- 1 cup cornflour (cornstarch) (gin extract dredging)
- 2 teaspoons garlic powdgin extract(for the dredging mixture)
- 1 teaspoon ongin extract powder (for the dredging mixture)
Preparing the Chicken Mixture
Step 1: Mince the Chicken
The foundation of delicious homemade chicken nuggets lies in the quality of the chicken and how it’s prepared. We’ll be using a mix of chicken breast and thighs. The breast provides a leaner texture, while the thighs add moisture and richness, ensuring our nuggets are tender and flavorful. For this recipe, we’ll start by finely mincing both the chicken breast and the chicken thighs. You can achieve this by using a food processor for a quick and even mince, or by very finely dicing the chicken by hand with a sharp knife. Aim for a consistency that’s not quite a paste, but small enough to form into nugget shapes easily. It’s important not to over-process if using a food processor, as this can lead to a rubbery texture. Pulse it just until finely minced.
Step 2: Seasoning the Chicken
Once your chicken is finely minced, it’s time to build flavor. In a medium bowl, combine the minced chicken with the 2 teaspoons of salt, 1 teaspoon of sugar, 1/2 teaspoon of MSG (if using – it’s a fantastic flavor enhancer that adds a wonderful savory depth), 2 teaspoons of garlic powder, 2 teaspoons of onion powder, 1 teaspoon of paprika, and 2 teaspoons of black pepper. The sugar helps to balance the saltiness and also aids in browning the nuggets. Paprika adds a lovely subtle warmth and a hint of color. Mix everything together thoroughly. Use your hands to ensure the seasonings are evenly distributed throughout the chicken mixture. This even distribution is key to having flavorful nuggets in every bite.
Step 3: Forming the Nuggets
Now comes the fun part – shaping our nuggets! Take portions of the seasoned chicken mixture and shape them into your desired nugget form. Think classic nugget shapes – ovals, slightly flattened rounds, or even small squares. The size is up to you, but remember to keep them relatively uniform in thickness so they cook evenly. A good tip is to slightly dampen your hands with water or a little oil to prevent the chicken mixture from sticking to them, making the shaping process smoother and neater. Place the shaped nuggets onto a parchment-lined baking sheet as you form them. This prevents them from sticking and makes them ready for the next stage.
Coating the Nuggets
Step 4: Preparing the Breading Station
For that irresistible crispy coating, we need a good breading station. Get two shallow dishes or bowls ready. In the first dish, crack the 1 large egg and whisk it lightly with a fork until the yolk and white are well combined. This egg wash will act as a binder, helping the flour and cornflour mixture adhere to the chicken. In the second dish, combine the 1 cup of all-purpose flour, 1 cup of cornflour (cornstarch), 2 teaspoons of garlic powder, 1 teaspoon of onion powder, and 1 tablespoon of salt. Whisk these dry ingredients together thoroughly to ensure the seasonings are evenly distributed. The cornflour is essential for achieving an extra crispy texture, making our nuggets incredibly satisfying to bite into.
Step 5: Breading the Nuggets
This is a two-step coating process for maximum crispiness. Take one shaped chicken nugget at a time and first dip it into the beaten egg, ensuring it’s fully coated. Let any excess egg drip off back into the dish. Then, transfer the egg-coated nugget to the flour and cornflour mixture. Press the mixture gently onto all sides of the nugget to ensure a good, even coating. You want a thick, substantial layer of the breading. For an even thicker, crispier crust, you can repeat the egg wash and breading process: dip the already breaded nugget back into the egg, then coat it again in the flour and cornflour mixture. This double-coating creates an exceptionally crunchy exterior that will be sure to impress. Once breaded, place the nuggets back onto the parchment-lined baking sheet.
Cooking the Nuggets
Step 6: Frying the Nuggets
Now it’s time to cook our beautifully prepared chicken nuggets to golden perfection! You have a couple of excellent cooking options. For the classic, most authentic nugget experience, pan-frying or shallow-frying is the way to go. Heat about 1 to 1.5 inches of neutral oil (like vegetable, canola, or peanut oil) in a large skillet or Dutch oven over medium-high heat until it reaches about 350°F (175°C). Carefully place the breaded nuggets into the hot oil, being careful not to overcrowd the pan. Overcrowding will lower the oil temperature and result in soggy nuggets. Fry in batches for about 3-5 minutes per side, or until they are golden brown and cooked through. Use a slotted spoon or tongs to remove the cooked nuggets and place them on a wire rack set over a baking sheet to drain any excess oil. This step is crucial for maintaining crispiness.
Step 7: Baking the Nuggets (Alternative Method)
If you prefer a healthier cooking method or want to make a larger batch at once without the fuss of frying, baking is a great alternative. Preheat your oven to 400°F (200°C). Arrange the breaded nuggets in a single layer on a baking sheet lined with parchment paper or a silicone baking mat. For an even crispier result when baking, you can lightly spray or brush the tops of the nuggets with cooking oil. Bake for 18-25 minutes, flipping them halfway through, until they are golden brown and cooked through. The exact baking time will depend on the size of your nuggets and your oven. Ensure they reach an internal temperature of 165°F (74°C) to be safe.
Step 8: Serving the Chicken Nuggets
Once your chicken nuggets are cooked to golden perfection, whether fried or baked, they are ready to be enjoyed! For the best texture, it’s ideal to serve them immediately while they are still warm and crispy. Arrange them on a platter and serve with your favorite dipping sauces. Classic choices like ketchup, barbecue sauce, honey mustard, or even a creamy ranch dip are always crowd-pleasers. These homemade chicken nuggets are significantly tastier and more satisfying than store-bought versions, and knowing exactly what goes into them is a wonderful bonus. Enjoy the fruits of your labor with family and friends!
Conclusion:
There you have it – a foolproof guide to making delicious, crispy, and golden CHICKEN NUGGETS right in your own kitchen! We’ve covered everything from selecting the best chicken cuts to achieving that perfect crunch with simple ingredients. These homemade CHICKEN NUGGETS are not only a crowd-pleaser for all ages but also a healthier alternative to store-bought options, as you control the quality of ingredients.
Serve your warm, freshly made CHICKEN NUGGETS with a variety of dipping sauces like honey mustard, barbecue, ketchup, or even a spicy aioli. They are fantastic as a main course, a party appetizer, or even packed for a satisfying lunchbox treat. Don’t be afraid to get creative with variations! You can try coating them with panko breadcrum extractbs for an extra crispy texture, adding a sprinkle of paprika or garlic powder to the breading for an extra flavor boost, or even incorporating finely grated Parmesan cheese for a cheesy twist. Enjoy the process and the incredibly rewarding taste of your homemade CHICKEN NUGGETS!
FAQs:
Can I make these CHICKEN NUGGETS ahead of time?
Yes, you can prepare the CHICKEN NUGGETS up to the point of cooking and store them in a single layer on a baking sheet lined with parchment paper in the refrigerator for up to 24 hours. For longer storage, freeze them on the baking sheet until solid, then transfer to a freezer-safe bag or container. When ready to cook from chilled, add a few extra minutes to the baking time. If cooking from frozen, you’ll need to significantly increase the cooking time and ensure they are thoroughly cooked through.
What is the best way to reheat leftover CHICKEN NUGGETS?
To maintain their crispiness, the best way to reheat leftover CHICKEN NUGGETS is in the oven or a toaster oven. Preheat your oven to 375°F (190°C) and spread the nuggets in a single layer on a baking sheet. Bake for about 5-10 minutes, or until heated through and crispy again. Avoid using the microwave, as it tends to make them soggy.
Easy Homemade Chicken Nuggets – Crispy & Delicious
Learn how to make incredibly crispy and delicious chicken nuggets from scratch with this easy homemade recipe. Perfect for a family meal or a crowd-pleasing snack.
Ingredients
-
300 g boneless, skinless chicken breast
-
250 g boneless, skinless chicken thighs
-
2 teaspoons salt
-
1 teaspoon sugar
-
1/2 teaspoon MSG
-
2 teaspoons garlic powder
-
2 teaspoons onion powder
-
1 teaspoon paprika
-
2 teaspoons black pepper
-
1 large egg
-
1 cup all-purpose flour
-
1 cup cornflour (cornstarch)
-
2 teaspoons garlic powder
-
1 teaspoon onion powder
-
1 tablespoon salt
Instructions
-
Step 1
Finely mince the chicken breast and thighs using a food processor or a sharp knife. Aim for a consistency that is not quite a paste but easy to shape. -
Step 2
In a medium bowl, combine the minced chicken with 2 teaspoons salt, 1 teaspoon sugar, 1/2 teaspoon MSG (if using), 2 teaspoons garlic powder, 2 teaspoons onion powder, 1 teaspoon paprika, and 2 teaspoons black pepper. Mix thoroughly until evenly distributed. -
Step 3
Shape the seasoned chicken mixture into nugget forms. Slightly dampen your hands with water or oil to prevent sticking. Place shaped nuggets onto a parchment-lined baking sheet. -
Step 4
Prepare the breading station. In one shallow dish, lightly whisk the egg. In another dish, combine 1 cup all-purpose flour, 1 cup cornflour, 2 teaspoons garlic powder, 1 teaspoon onion powder, and 1 tablespoon salt. Whisk dry ingredients well. -
Step 5
Dip each shaped nugget into the beaten egg, letting excess drip off. Then, coat thoroughly in the flour and cornflour mixture, pressing gently to adhere. For extra crispiness, repeat the egg wash and breading process. -
Step 6
To fry, heat 1-1.5 inches of neutral oil to 350°F (175°C) in a skillet. Fry nuggets in batches for 3-5 minutes per side until golden brown and cooked through. Drain on a wire rack. -
Step 7
To bake, preheat oven to 400°F (200°C). Arrange breaded nuggets on a parchment-lined baking sheet. Bake for 18-25 minutes, flipping halfway, until golden and cooked through. Ensure internal temperature reaches 165°F (74°C). -
Step 8
Serve warm with your favorite dipping sauces like ketchup, barbecue sauce, or honey mustard for the best crispy texture.
Important Information
Nutrition Facts (Per Serving)
It is important to consider this information as approximate and not to use it as definitive health advice.
Allergy Information
Please check ingredients for potential allergens and consult a health professional if in doubt.