Mini Cannoli Cups – Easy Sweet Italian Dessert
Mini Cannoli Cups are about to become your new favorite dessert obsession, and I’m so excited to share this recipe with you! These delightful little bites capture all the magic of traditional cannoli but in a perfectly portioned, incredibly approachable package. Forget the fuss of rolling and frying shells; these mini cannoli cups offer that irresistible crispy, sweet shell texture paired with a lusciously creamy ricotta filling. We all know and love the classic cannoli for its elegant simplicity and that satisfying crunch followed by a smooth, sweet center. What makes these mini cannoli cups particularly special is their versatility and ease of creation. They’re ideal for parties, a delightful afternoon treat, or even just a little indulgence for yourself. Get ready to impress your friends and family, or simply treat yourself to a taste of pure Italian sunshine, all in these adorable mini cannoli cups.

Mini Cannoli Cups
Craving the delightful crunch and creamy sweetness of cannoli but don’t want the fuss of rolling and frying dough? I have the perfect solution for you: Mini Cannoli Cups! These little beauties capture all the irresistible flavors of traditional cannoli in a super-easy, no-fry format. Using store-bought pie crusts is a game-changer, transforming them into crispy, golden cups that are beggin extractg to be filled with a luscious ricotta mixture. They’re perfect for parties, holidays, or just a special treat when you want something a little bit decadent. The process is straightforward, and the results are truly impressive, making them a go-to recipe in my kitchen.
Ingredients:
Creating Your Crispy Cups
The foundation of our mini cannoli cups lies in transforming the refrigerated pie crusts into delightful, edible vessels. This step is surprisingly simple and yields perfectly crisp results that mimic the texture of traditional fried cannoli shells without the mess.
1. Prepare the Pie Crusts: Begin extract by carefully unrolling your softened pie crusts. You’ll want to work with them on a lightly floured surface to prevent sticking. Using a round cookie cutter or a glass with a rim of about 3-4 inches in diameter, cut out as many circles as you can from each pie crust. Don’t worry if you have some scraps; you can often gently press them together and cut out more circles. You’ll be pressing these circles into the cups of your mini muffin tin. Lightly grease your mini muffin tin to ensure the crusts don’t stick after baking. Gently press each pie crust circle into the individual cups of the mini muffin tin, allowing the edges to come up the sides slightly. Prick the bottom of each crust with a fork a few times; this helps prevent the dough from puffing up too much during baking and ensures a more even crisp.
2. Bake the Cups: Preheat your oven to 375°F (190°C). Place the filled mini muffin tin into the preheated oven. Bake for approximately 12-15 minutes, or until the edges of the pie crust are golden brown and crispy. Keep a close eye on them, as ovens can vary, and you don’t want them to burn. Once they are beautifully golden and cooked through, carefully remove the muffin tin from the oven. Let the cups cool in the tin for a few minutes before attempting to remove them. This allows them to firm up a bit more.
3. Cooling and Finishing the Cups: After a few minutes in the tin, carefully invert the muffin tin onto a wire rack to release the baked cannoli cups. If any seem a little stubborn, a gentle wiggle should help them come free. Allow them to cool completely on the wire rack. This cooling step is crucial; if you try to fill them while they are still warm, the filling might melt or become too soft. While the cups are cooling, prepare your turbinado sugar and cinnamon mixture. In a small bowl, combine the 3 tablespoons of turbinado sugar and 1 teaspoon of ground cinnamon. Once the cups are completely cool, you can optionally dip the edges of the cups into this spiced sugar mixture for an extra layer of flavor and texture. This is purely optional, but it adds a lovely touch.
Whipping Up the Creamy Filling
Now for the star of the show – the luscious, sweet ricotta filling! This is where all the authentic cannoli flavor truly shines.
4. Prepare the Ricotta Filling: In a medium bowl, combine the drained whole-milk ricotta cheese. It’s important to drain the ricotta well; excess liquid can make your filling watery. You can do this by placing the ricotta in a fine-mesh sieve lined with cheesecloth and letting it drain for at least 30 minutes, or even better, overnight in the refrigerator. Add the 1/2 cup of powdered sugar, 2 tablespoons of granulated sugar, 1 teaspoon of orange or lemon zest (using fresh zest is key for that bright, authentic citrus flavor!), and 1/2 teaspoon of vanilla extract to the ricotta. Using an electric mixer on medium speed, or a whisk, beat the mixture until it is smooth, creamy, and well combined. Scrape down the sides of the bowl occasionally to ensure everything is incorporated. You are aiming for a light and airy consistency.
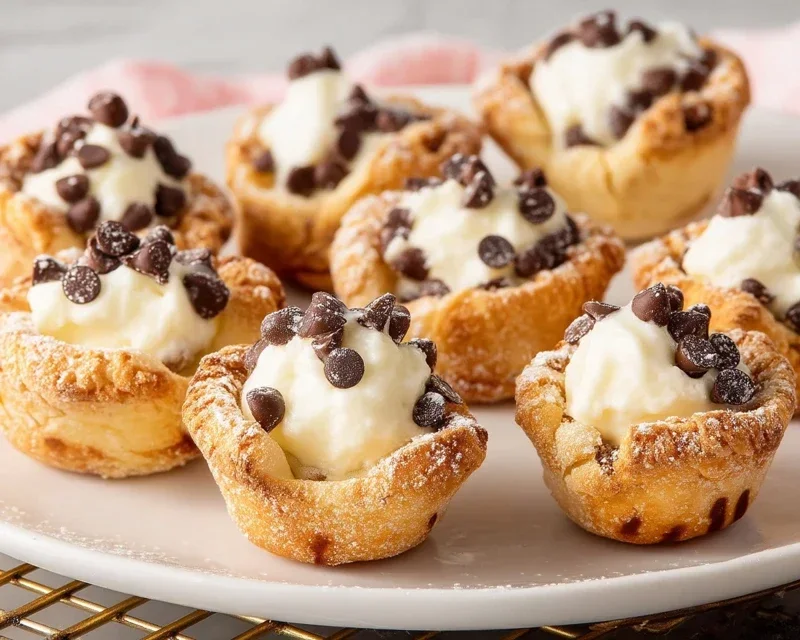
5. Assemble and Garnish: Once the ricotta filling is smooth and creamy, and your pie crust cups are completely cooled, it’s time to assemble. You can spoon the filling directly into the cooled cups, or for a neater presentation, transfer the filling to a piping bag fitted with a star tip and pipe it into each cup. Fill them generously. Once filled, sprinkle the tops with the miniature semisweet chocolate chips or the finely chopped pistachios. These additions provide a delightful contrast in texture and a beautiful visual appeal. Finally, for that classic cannoli finish, lightly dust the tops of your Mini Cannoli Cups with additional powdered sugar just before serving. This adds a final touch of sweetness and elegance.
Enjoy these delightful Mini Cannoli Cups! They are best enjoyed the day they are made, ensuring the perfect balance of crispy crust and creamy filling.
Conclusion:
There you have it – a delightful and remarkably simple way to enjoy the classic taste of cannoli without the fuss of rolling and frying. These Mini Cannoli Cups are an absolute triumph of flavor and convenience, making them perfect for any occasion, from casual gatherings to more elegant dessert spreads. The crisp, buttery shells are a delightful contrast to the creamy, sweet ricotta filling, and the customizable toppings allow for endless creativity. I truly believe this recipe is a game-changer for anyone who loves cannoli but wants a more approachable baking project.
These little beauties are incredibly versatile. Serve them as a charming after-dinner treat, a sophisticated addition to a dessert buffet, or even as a fun activity to make with family. For serving suggestions, consider a dusting of powdered sugar, a drizzle of chocolate ganache, or a sprinkle of chopped pistachios for that authentic touch. Thinking about variations? You could easily incorporate mini chocolate chips directly into the filling, or experiment with different extracts like almond or orange. The possibilities are truly endless!
I wholeheartedly encourage you to give these Mini Cannoli Cups a try. They are surprisingly easy to assemble and the results are absolutely rewarding. You’ll be amazed at how quickly they disappear!
Frequently Asked Questions:
Can I make the cannoli shells ahead of time?
Absolutely! The pre-made tart shells can be stored in an airtight container at room temperature for up to two days. Just be sure they are completely cooled before storing them.
What kind of ricotta cheese should I use?
Whole milk ricotta cheese will give you the creamiest and most flavorful filling. It’s also important to drain the ricotta well before mixing to prevent a watery filling.
Can I substitute the ricotta filling?
While ricotta is traditional, you could experiment with a mascarpone-based filling for a richer flavor, or even a cream cheese filling for a tangier twist. Just remember to adjust sweetness as needed.
Mini Cannoli Cups
Delightful mini cannoli cups made with flaky pie crust and a creamy, sweet ricotta filling. Perfect for parties and dessert.
Ingredients
-
1 container whole-milk ricotta cheese (15 oz., drained)
-
1/2 cup powdered sugar
-
2 tablespoons granulated sugar
-
1 teaspoon finely grated orange zest
-
1/2 teaspoon vanilla extract
-
1 box refrigerated pie crusts, softened as directed on box (2 count )
-
3 tablespoons turbinado sugar (raw sugar)
-
1 teaspoon ground cinnamon
-
1/4 cup miniature semisweet chocolate chips
-
additional powdered sugar
Instructions
-
Step 1
In a medium bowl, combine the drained ricotta cheese, powdered sugar, granulated sugar, orange zest, and vanilla extract. Stir until smooth and well combined. -
Step 2
Preheat your oven to 375°F (190°C). Lightly grease muffin tins. Unroll the refrigerated pie crusts. Cut each crust into 6 equal squares. -
Step 3
Press one pie crust square into each muffin cup, gently pressing it into the bottom and up the sides to form a cup shape. -
Step 4
Bake for 10-12 minutes, or until the crusts are golden brown and slightly puffed. -
Step 5
Remove from oven and let cool in the muffin tin for 5 minutes before carefully transferring to a wire rack to cool completely. -
Step 6
In a small bowl, combine the turbinado sugar and ground cinnamon. Mix well. -
Step 7
Once the pie crust cups are completely cooled, spoon the ricotta filling into each cup. Top with miniature chocolate chips. -
Step 8
Lightly dust with additional powdered sugar before serving.
Important Information
Nutrition Facts (Per Serving)
It is important to consider this information as approximate and not to use it as definitive health advice.
Allergy Information
Please check ingredients for potential allergens and consult a health professional if in doubt.