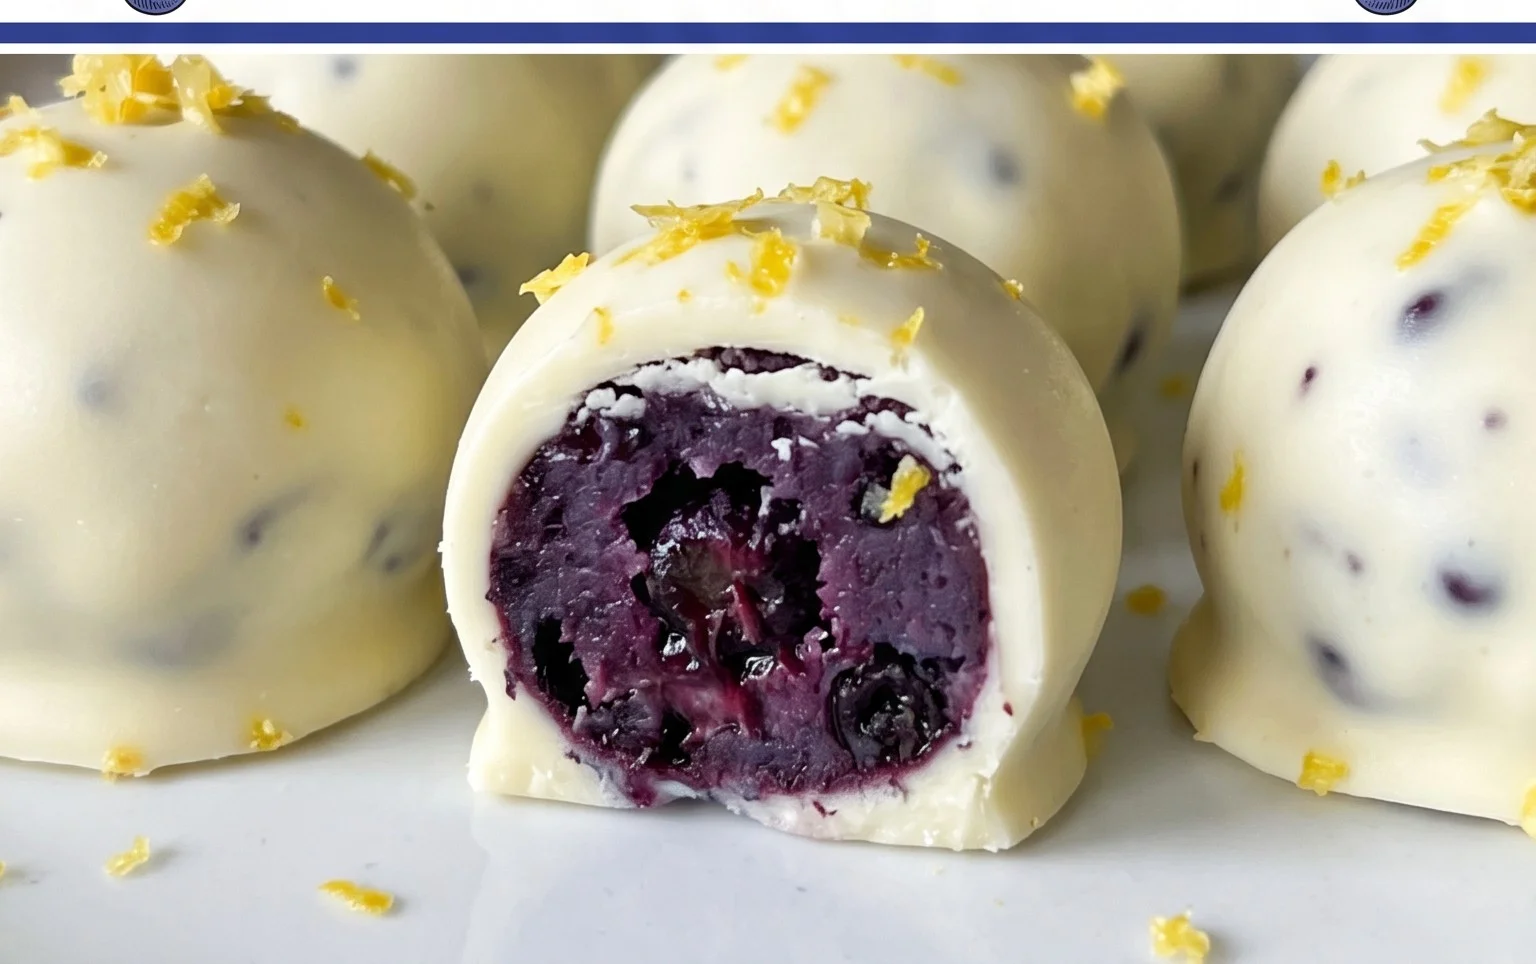
Lemon Blueberry Truffles- Easy Delightful Dessert
Lemon Blueberry Truffles are an absolute delight, a tiny explosion of sunshine and sweetness that I just can’t get enough of. Imagin extracte the bright, zesty tang of fresh lemon perfectly balanced with the juicy burst of ripe blueberries, all enrobed in a rich, creamy chocolatey shell. It’s no wonder these delightful little bites are such a crowd-pleaser! People adore them because they offer a sophisticated yet incredibly easy-to-make treat that feels both elegant and wonderfully comforting. What truly sets these Lemon Blueberry Truffles apart is that magical combination of flavors – the tartness cuts through the sweetness beautifully, creating a harmonious and unforgettable taste sensation. They are the perfect little indulgence for any occasion, from a fancy tea party to a cozy movie night in.
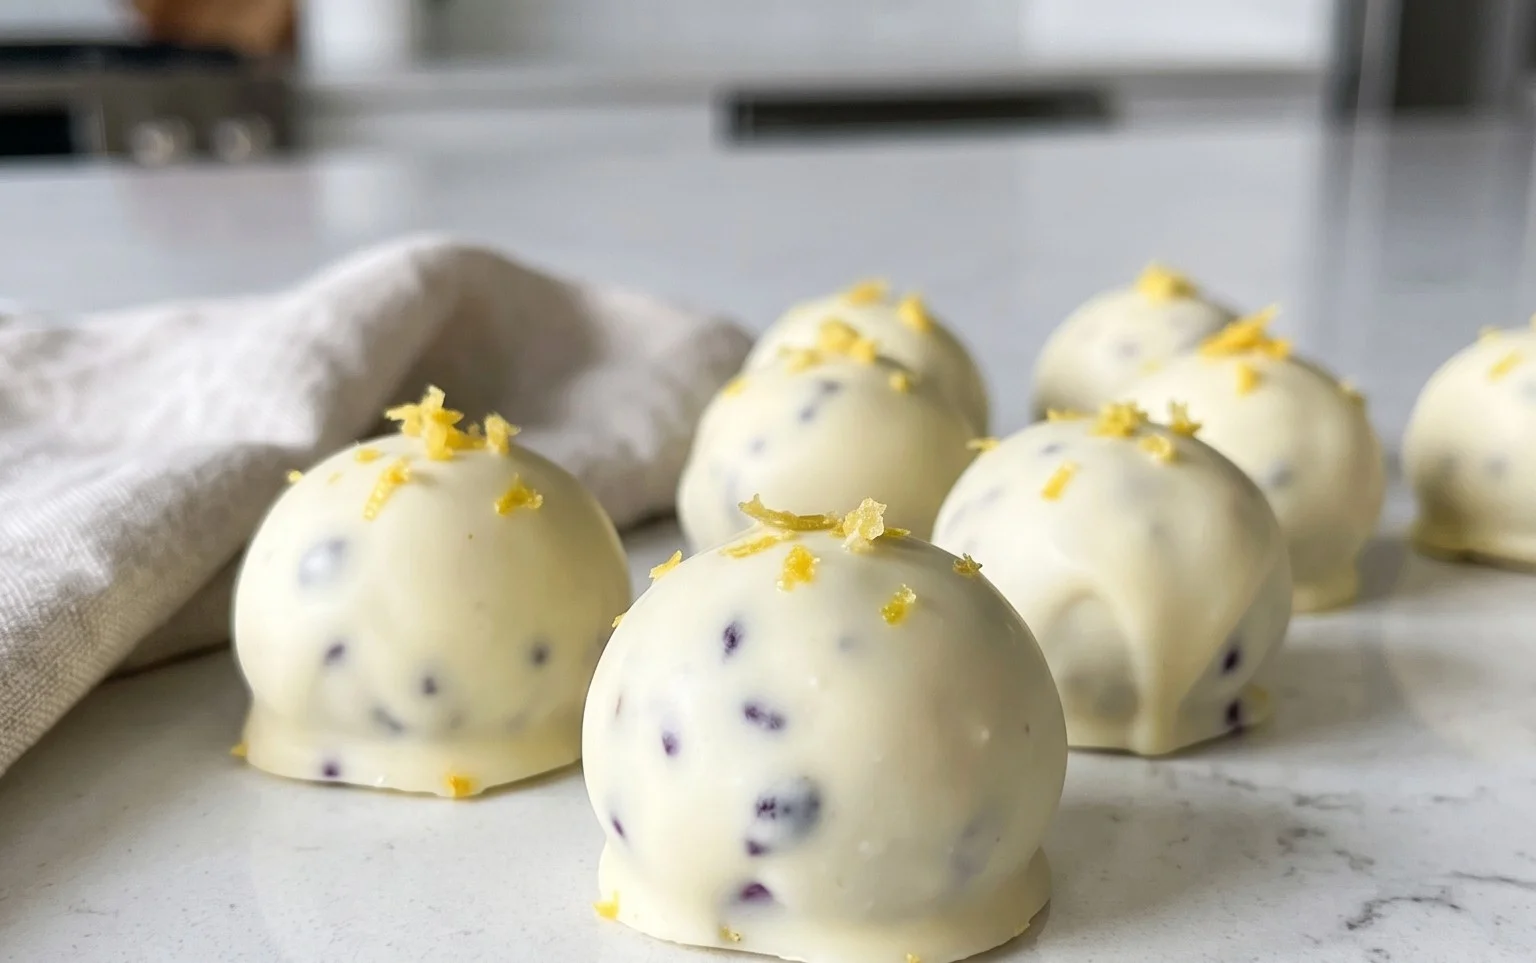
Lemon Blueberry Truffles
Get ready to experience a burst of bright, refreshing flavor with these incredibly easy Lemon Blueberry Truffles! These delightful little bites are not only a treat for your taste buds but also a joy to make. They’re naturally sweetened, packed with wholesome ingredients, and wonderfully adaptable. Whether you’re looking for a healthy dessert option, a fun baking project with kids, or a way to impress guests with a homemade confection, these truffles are sure to be a hit.
The magic of these truffles lies in their simple, no-bake preparation. We’ll be creating a flavorful base using vibrant blueberries, nutrient-rich walnuts, and naturally sweet dates, then coating them in a creamy, zesty frosting that perfectly complements the fruit. The hint of lemon throughout both layers adds a sophisticated citrus note that makes these truffles truly special.
Ingredients:
Cooking Instructions:
Step 1: Preparing the Truffle Base
Begin extract by gathering your ingredients for the truffle base. If you’re using frozen blueberries, make sure they are completely thawed and pat them gently with a paper towel to remove excess moisture. In a food processor, add the walnuts and pulse them until they are finely ground but not yet a paste. This gives us a nice texture to work with. Next, add the pitted dates to the food processor. Process until the dates form a sticky ball or a coarse paste. This sticky texture is crucial for binding our truffle mixture together. Add the ground walnuts back into the food processor along with the thawed blueberries, gluten-free rolled oats, shredded coconut, chia seeds, and the juice of one lemon.
Pulse and process all these ingredients together until they are well combined. You want the mixture to be cohesive enough to hold its shape when squeezed. It might look a little crum extractbly at first, but keep processing. If it feels too dry, you can add another teaspoon or two of lemon juice or even a tablespoon of water to help it come together. The goal is a dough-like consistency that you can easily roll into balls. Take a small amount of the mixture and try to roll it between your palms; if it stays together, you’re good to go. Be careful not to over-process, as this can make the truffle base gummy.
Step 2: Rolling the Truffle Centers
Once the truffle base mixture is ready, it’s time to form the truffle centers. Line a baking sheet or a plate with parchment paper. This will prevent the truffles from sticking and make them easy to handle. Scoop out about a tablespoon of the mixture at a time. Roll the mixture firmly between the palms of your hands to create small, compact balls. Aim for a consistent size so that your truffles are uniform in appearance. This step is quite therapeutic, and you can get the whole family involved! As you roll each truffle, place it on the prepared baking sheet. Once all the mixture has been rolled into balls, place the baking sheet in the freezer for at least 30 minutes. This chilling period is important because it will firm up the truffle centers, making them easier to coat with the frosting and preventing them from falling apart.
Step 3: Crafting the Creamy Lemon Frosting
While the truffle centers are chilling, we’ll prepare the luscious frosting. First, make sure your cashews are drained and rinsed thoroughly if you soaked them. These soaked cashews will provide the creamy base for our frosting, mimicking the richness of traditional dairy-based frostings. In a high-speed blender or a good quality food processor, combine the drained cashews, melted and slightly cooled coconut oil, raw honey (or your chosen sweetener), vanilla extract, and the juice of another lemon. The combination of lemon juice and zest (optional, if you have an extra lemon and like a stronger lemon flavor) will infuse the frosting with that signature bright, zesty taste.
Begin extract blending on a low speed, then gradually increase to high. You may need to scrape down the sides of the blender or food processor a few times to ensure all the ingredients are incorporated. If the mixture is too thick and the blender is struggling, add the warm water, one tablespoon at a time, until you reach a smooth, luscious, and spreadable consistency. The frosting should be thick but pourable, similar to a thick frosting or a rich ganache. Taste and adjust the sweetness or tartness as needed. You might want a bit more honey for sweetness or a touch more lemon juice for tang.
Step 4: Coating the Truffles
Now for the most exciting part – coating the chilled truffle centers! Take the baking sheet with the firm truffle balls out of the freezer. Using two forks or a small spoon and a fork, carefully dip each frozen truffle center into the prepared lemon frosting. Ensure each truffle is fully coated. Gently lift the coated truffle out of the frosting, allowing any excess to drip back into the bowl. Place the newly coated truffles back onto the parchment-lined baking sheet. You can create a beautiful finish by drizzling a little extra frosting over the top or even by dusting them with a touch of shredded coconut or lemon zest immediately after coating. Work relatively quickly to prevent the truffle centers from softening too much. If the frosting starts to thicken too much in the bowl, you can gently warm it for a few seconds by placing the bowl over a warm water bath, but be careful not to overheat it.
Step 5: Chilling to Perfection
Once all the truffle centers are beautifully coated in the creamy lemon frosting, it’s time for them to set. Carefully transfer the baking sheet with the coated truffles back into the refrigerator. Let them chill for at least 1 hour, or until the frosting is firm to the touch. This final chilling period is crucial for the frosting to fully set and for the flavors to meld together. Once they are firm, you can transfer them to an airtight container. These Lemon Blueberry Truffles are best stored in the refrigerator to maintain their shape and freshness. They will keep for up to a week, though they rarely last that long! Enjoy these vibrant, guilt-free treats as a delightful dessert, an afternoon pick-me-up, or a beautiful addition to any gathering.
Conclusion:
There you have it – a simple yet utterly delightful recipe for Lemon Blueberry Truffles that’s sure to impress. These little spheres of sunshine are fantastic because they strike a perfect balance between tart lemon zest and sweet, juicy blueberries, all enveloped in a creamy, melt-in-your-mouth chocolate coating. They are surprisingly easy to make, making them a perfect project for both begin extractner and experienced bakers looking for a special treat. These Lemon Blueberry Truffles are incredibly versatile. Enjoy them as a sophisticated dessert after a meal, a vibrant addition to a dessert platter, or even as a thoughtful homemade gift. The bright flavors are wonderfully refreshing and will leave your taste buds singin extractg. I truly encourage you to give this recipe a try; you won’t be disappointed by the burst of flavor and the sheer joy they bring!
Frequently Asked Questions:
Can I make these Lemon Blueberry Truffles ahead of time?
Absolutely! These truffles are perfect for making ahead. Once rolled and coated, store them in an airtight container in the refrigerator for up to a week. They’re even better when they’ve had a chance to chill and the flavors meld together.
What kind of chocolate should I use for coating?
For the best results, I recommend using good quality white chocolate for the coating. It pairs beautifully with the lemon and blueberry filling and provides a lovely canvas for the vibrant colors. You can also experiment with milk or dark chocolate if you prefer a different flavor profile, though it will alter the overall taste.
Can I use fresh blueberries instead of frozen?
While frozen blueberries are often preferred for their ability to release moisture when heated, which aids in the truffle formation, you can use fresh ones. If using fresh, make sure to mash them slightly to release their juices before incorporating them into the mixture. You might need to adjust the chilling time slightly to ensure the mixture firms up properly.
Lemon Blueberry Truffles
No-bake, healthy truffles bursting with lemon and blueberry flavor, made with wholesome ingredients.
Ingredients
-
1 cup wild blueberries
-
1 cup walnuts
-
1 cup dates
-
3 tbsp gluten-free rolled oats
-
2 tbsp shredded coconut
-
1 tbsp chia seeds
-
1 lemon, juiced
-
1 cup cashews (soaked for about 30 minutes)
-
½ cup coconut oil, melted and cooled
-
3 tbsp raw honey
-
1 tsp vanilla extract
-
1 lemon, juiced
-
2-3 tbsp warm water (as needed to help blend)
Instructions
-
Step 1
For the truffle base: Combine blueberries, walnuts, dates, oats, coconut, chia seeds, and lemon juice in a food processor. Pulse until a sticky dough forms. -
Step 2
Roll the dough into small balls and place them on a parchment-lined baking sheet. -
Step 3
For the frosting: In a blender, combine soaked cashews, melted coconut oil, honey, vanilla extract, and lemon juice. -
Step 4
Blend until smooth and creamy, adding warm water one tablespoon at a time if needed to reach desired consistency. -
Step 5
Dip each truffle into the cashew frosting, ensuring it is fully coated. -
Step 6
Return the frosted truffles to the parchment-lined sheet and refrigerate for at least 30 minutes, or until firm.
Important Information
Nutrition Facts (Per Serving)
It is important to consider this information as approximate and not to use it as definitive health advice.
Allergy Information
Please check ingredients for potential allergens and consult a health professional if in doubt.