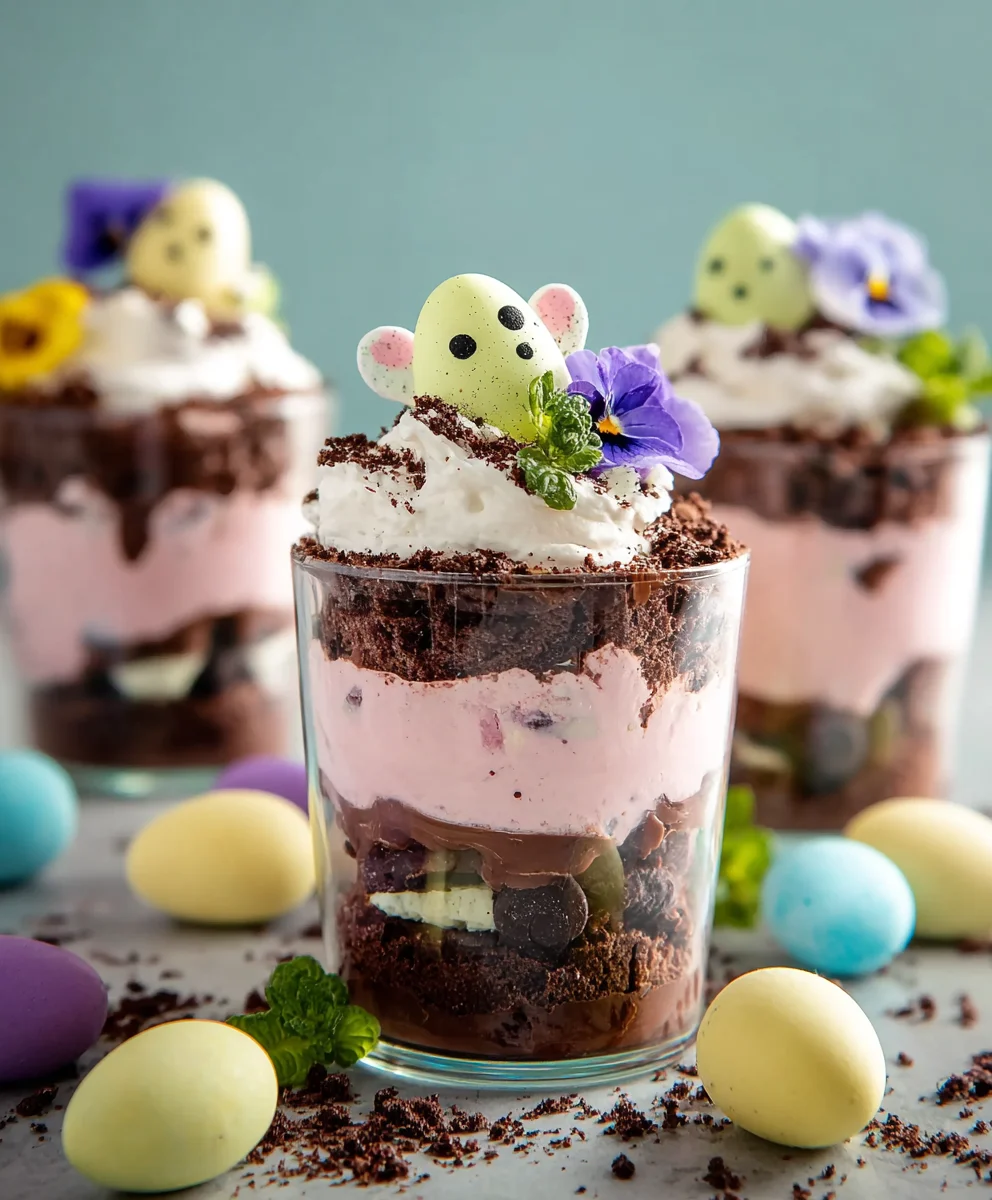
Easter Dirt Cups- Fun & Easy Spring Dessert
Easter Dirt Cups are more than just a sweet treat; they’re a nostalgic hug on a plate, a playful edible landscape that brings joy to every age. Who doesn’t love diggin extractg into a cup of rich, creamy pudding topped with a delightful crum extractble that mimics freshly turned earth? This beloved Easter dessert has a magical way of transforming simple ingredients into a miniature wonderland, making it an absolute must-have for your holiday celebrations. What truly sets these Easter Dirt Cups apart is their whimsical presentation and the delightful textural contrast between the smooth pudding and the crunchy rum extractkie crumbs, often adorned with charming gummy worms or festive candy flowers. They offer a burst of chocolatey goodness that’s both comforting and exciting, perfect for little hands to assemble and devour, or for grown-ups to savor as a delightful reminder of childhood Easters. Get ready to create some edible magic with this easy and utterly enchanting recipe!
Ingredients:
- 1 package (3.9 oz.) vanilla instant pudding mix
- 2 cups cold milk
- 1 container (8 oz.) Cool Whip, thawed
- Food coloring (suggested: purple and pink)
- 1 package Oreo cookies, finely crushed with filling removed
- Shredded coconut
- Candy eggs (like mini egg candies)
- Peeps marshmallow chicks or bunnies
- Food coloring for coconut
Preparing the “Dirt”
Crushing the Oreos
The first step to creating our delicious Easter Dirt Cups is to prepare the “dirt” layer, which comes from our Oreo cookies. You’ll want to take your entire package of Oreo cookies and process them into fine crum extractbs. The easiest way to do this is to place them in a food processor and pulse until they are very fine, resembling soil. If you don’t have a food processor, you can place the Oreos in a sturdy zip-top bag, remove as much air as possible, and then use a rolling pin to crush them thoroughly. Make sure to get them as fine as possible, as this will give your dirt cups a more realistic and enjoyable texture. You can leave the filling in or remove it; for this recipe, we’re removing the filling to achieve a darker, more soil-like appearance and taste.
Making the Pudding Layer
Mixing the Pudding
Next, we’ll prepare the creamy pudding layer that forms the base of our dirt cups. In a medium-sized bowl, combine the 1 package of vanilla instant pudding mix with 2 cups of cold milk. It’s crucial to use cold milk; this is what activates the instant pudding and allows it to set up properly and quickly. Whisk the mixture vigorously for about 2 minutes, or until it begin extracts to thicken. You’ll notice it transform from a liquid to a smooth, pudding-like consistency. It’s important not to overmix, as this can sometimes make the pudding gummy. Once thickened, set this bowl aside for a few minutes to allow it to firm up a bit more.
Incorporating the Cool Whip
Now it’s time to lighten up our pudding and make it even more decadent by adding the Cool Whip. Take your thawed 8 oz. container of Cool Whip and gently fold it into the thickened vanilla pudding. Use a spatula or a large spoon for this step, and be gentle. The goal is to combine the two ingredients without deflating the airy texture of the Cool Whip. Continue to fold until there are no streaks of pudding or Cool Whip visible, and you have a uniform, fluffy mixture. This will create a delightful, creamy layer that perfectly complements the crunchy cookie “dirt.”
Coloring and Decorating the Dirt Cups
Creating Colorful “Easter Grass”
To add a festive Easter touch, we’ll color some shredded coconut to resemble Easter grass. Divide your shredded coconut into a few small bowls, depending on how many colors you’d like to create. For this recipe, we’re using suggested colors of purple and pink. Add a few drops of food coloring to each bowl of coconut. Start with a small amount and add more if needed to achieve your desired vibrancy. Then, using your fingers or a spoon, gently toss the coconut until the color is evenly distributed. You’ll want to wear gloves for this part to avoid staining your hands. Once colored, spread the coconut out on a plate or tray to dry slightly while you assemble the cups.
Assembling the Easter Dirt Cups
Now for the fun part: assembling your Easter Dirt Cups! Grab your serving cups or glasses. Start by spooning a layer of your creamy pudding mixture into the bottom of each cup. You want to fill it about a third of the way full. Next, generously sprinkle a layer of your finely crushed Oreo “dirt” over the pudding. Press down gently to create a solid layer. Then, add another layer of the pudding mixture, filling the cups up to about two-thirds full. Top this with another generous layer of the Oreo “dirt,” making sure to cover the pudding completely to mimic a freshly tilled garden. For extra flair, you can create little mounds and valleys with the dirt.
Adding the Easter Embellishments
This is where your Easter Dirt Cups truly come to life! Strategically place a few candy eggs on top of the “dirt” layer, nestled in as if they’ve been laid by an Easter bunny. Then, artfully arrange your Peeps marshmallow chicks or bunnies among the candy eggs and “dirt.” You can stick them down gently into the pudding or perch them on top. Finally, take your colored shredded coconut “grass” and sprinkle it around the Peeps and candy eggs, adding a burst of vibrant color and a delightful texture. You can add as much or as little “grass” as you like. For a truly immersive experience, consider adding a few more candy eggs or even some edible flowers if you have them. Chill the assembled dirt cups in the refrigerator for at least 30 minutes before serving to allow the flavors to meld and the pudding to set up completely. This also makes them wonderfully refreshing. Enjoy your whimsical and delicious Easter creation!

Conclusion:
Congratulations, you’ve now mastered the art of creating delicious and festive Easter Dirt Cups! These delightful treats are more than just a dessert; they’re a fun and engagin extractg activity for the whole family. The combination of rich chocolate pudding, crunchy crushed cookies, and sweet gummy worms is a classic for a reason, offering a delightful textural and flavor experience with every spoonful. Whether you’re looking for a crowd-pleasing dessert for your Easter gathering or a simple, enjoyable baking project, these Easter Dirt Cups are sure to be a hit.
For serving, individual portions in clear cups or small mason jars are perfect for presentation and easy distribution. You can even add a small Easter-themed tag to each cup for an extra special touch. Don’t be afraid to get creative with your toppings! Consider adding a few pastel-colored sprinkles, a fondant carrot, or even a small chocolate Easter egg nestled into the “dirt.”
I encourage you to experiment with variations to make these Easter Dirt Cups uniquely yours. You could try different flavored puddings, such as vanilla or cheesecake, or use chocolate sandwich cookies with creme filling for a richer cookie base. For a grown-up twist, a splash of coffee liqueur extract in the pudding would add a sophisticated flavor. No matter how you choose to customize them, the joy of making and sharing these Easter Dirt Cups is what truly matters. So go ahead, have fun, and enjoy every delicious bite!
Frequently Asked Questions:
Can I make Easter Dirt Cups ahead of time?
Yes, absolutely! You can prepare the pudding and crush the cookies a day in advance. Assemble the Easter Dirt Cups a few hours before serving to ensure the cookies remain crunchy and the pudding is set. Storing them covered in the refrigerator will keep them fresh.
What are some kid-friendly variations for Easter Dirt Cups?
For younger children, consider using brightly colored candies like jelly beans or M&Ms as an alternative to gummy worms. You could also use vanilla pudding and top with white chocolate shavings to create a “snowy” effect, or use green-colored coconut flakes for “grass.”
How do I get the “dirt” effect with the cookies?
The best way to achieve the classic “dirt” look is to thoroughly crush chocolate sandwich cookies (like Oreos) in a food processor or by placing them in a zip-top bag and crushing them with a rolling pin until they resemble fine crum extractbs. This ensures an even distribution of “dirt” over the pudding layer.
Easter Dirt Cups- Fun & Easy Spring Dessert
Create a whimsical and delicious Easter dessert with these fun and easy Easter Dirt Cups, featuring layers of creamy pudding and chocolate cookie “dirt,” topped with festive candy eggs and marshmallow Peeps.
Ingredients
-
1 package (3.9 oz.) vanilla instant pudding mix
-
2 cups cold milk
-
1 container (8 oz.) Cool Whip, thawed
-
Food coloring (suggested: purple and pink)
-
1 package Oreo cookies, finely crushed with filling removed
-
Shredded coconut
-
Candy eggs (like mini egg candies)
-
Peeps marshmallow chicks or bunnies
Instructions
-
Step 1
Prepare the “dirt” by finely crushing 1 package of Oreo cookies, removing the filling for a darker color. A food processor or a rolling pin in a zip-top bag can be used. -
Step 2
Make the pudding layer by whisking 1 package of vanilla instant pudding mix with 2 cups of cold milk for about 2 minutes until thickened. Set aside. -
Step 3
Gently fold 1 container (8 oz.) of thawed Cool Whip into the thickened pudding until just combined and fluffy. -
Step 4
Create colorful “Easter grass” by dividing shredded coconut into small bowls and coloring it with purple and pink food coloring, tossing to distribute evenly. Let it dry slightly. -
Step 5
Assemble the dirt cups by layering pudding and crushed Oreos in serving cups. Fill about a third with pudding, then a layer of “dirt,” then fill to two-thirds with pudding, and top with another layer of “dirt.” -
Step 6
Decorate by placing candy eggs and Peeps marshmallow chicks or bunnies on top of the “dirt.” Sprinkle with the colored coconut “grass.” Chill for at least 30 minutes before serving.
Important Information
Nutrition Facts (Per Serving)
It is important to consider this information as approximate and not to use it as definitive health advice.
Allergy Information
Please check ingredients for potential allergens and consult a health professional if in doubt.