Perfect Grilled Pizza Recipe- Easy Step-by-Step Guide
How to Make the Perfect Grilled Pizza is a quest many of us embark on, and for good reason! There’s something undeniably magical about a pizza cooked over an open flame. Forget soggy crusts and unevenly melted cheese; we’re talking about a crispy, slightly charred base that cradles vibrant toppings with smoky intensity. It’s the kind of dish that brings people together, transforming a simple meal into a backyard fiesta. What makes grilled pizza so special? It’s the alchemy of heat and char, transforming humble ingredients into a gourmet experience right in your own home. This isn’t just another pizza; it’s an adventure for your taste buds, a testament to simple ingredients elevated by the primal power of fire. Let’s dive into how to achieve that coveted, smoky perfection, making your own perfect grilled pizza a regular occurrence.
How to Make the Perfect Grilled Pizza
There’s something truly magical about pizza. But have you ever considered taking that beloved comfort food and infusing it with the smoky char of the grill? Grilled pizza is a revelation. The intense heat of the grill creates a wonderfully crisp crust with just the right amount of chew, and the subtle smokiness adds a depth of flavor that’s impossible to replicate in a conventional oven. It might sound intimidating, but trust me, once you’ve mastered this technique, you’ll be firing up the grill for pizza nights all summer long. Forget soggy bottoms and unevenly cooked toppings – grilled pizza is the answer to your pizza prayers. Let’s get started on crafting your perfect pie.
Ingredients:
Preparing Your Dough and Toppings
The foundation of any great pizza is its dough. For grilled pizza, a slightly thicker dough works best as it can withstand the direct heat. If you’re using store-bought dough, let it come to room temperature for at least 30 minutes before you plan to grill. This makes it much easier to stretch. If you’re making your own, ensure it’s had a good rise.
While your dough is resting, preheat your grill to medium-high heat. You want it hot enough to sear the dough quickly, creating those coveted grill marks and a crisp crust, but not so hot that it burns before the toppings have a chance to warm. Aim for a temperature around 450-500°F (230-260°C).
Next, it’s time to prep your toppings. Grilling pizza is a fast process, so having everything ready to go before you start is crucial. Chop your vegetables, slice your meats, and have your cheeses measured out. Remember that the toppings will only cook for a short time on the grill, so it’s best to use ingredients that cook quickly or are already cooked. For example, pre-cooked sausage or beef pepperoni is ideal. If you’re using raw vegetables like onions or peppers, slice them thinly to ensure they soften.
Grilling the Crust
This is where the magic happens. Lightly flour a clean surface and gently stretch or roll your pizza dough into your desired shape. Don’t aim for perfection; rustic is beautiful. Brush one side of the stretched dough generously with olive oil. This not only prevents sticking but also helps to create a beautiful, golden-brown crust.
Carefully transfer the dough, oiled-side down, directly onto the hot grill grates. Close the lid of your grill and cook for 2-4 minutes, or until you see nice grill marks and the dough starts to puff up. Keep an eye on it – this can happen quickly! You want to get a good char without burning.
Once the bottom is nicely browned and has those characteristic grill marks, carefully flip the dough using a spatula or tongs. Now, the cooked side is facing up, ready for your toppings.
Assembling and Finishing Your Grilled Pizza
With one side of your dough beautifully grilled, it’s time to get creative with your toppings. Work quickly so the dough doesn’t continue to cook on the un-topped side for too long.
Spread a thin, even layer of your pizza sauce over the grilled side of the dough, leaving a small border for the crust. Be careful not to overload the pizza with sauce, as this can make the crust soggy. Next, sprinkle generously with mozzarella cheese, followed by the grated Parmesan cheese. Finally, arrange your chosen toppings over the cheese. Again, don’t go overboard; too many toppings can weigh down the pizza and prevent even cooking.
Close the grill lid again and continue to cook for another 4-6 minutes, or until the cheese is melted and bubbly and the crust is golden brown and cooked through. The direct heat from the grill will melt the cheese and warm the toppings beautifully. You can peek under the crust to ensure it’s cooked to your liking. If the toppings seem to be cooking faster than the crust, you can move the pizza to a slightly cooler part of the grill.
Serving Your Masterpiece
Once your grilled pizza is perfectly cooked, carefully remove it from the grill using a pizza peel or a large spatula. Transfer it to a cutting board. If you like, you can add a drizzle of olive oil or a sprinkle of fresh herbs like basil or oregano at this stage. Let it rest for just a minute or two before slicing. This allows the cheese to set slightly, making it easier to cut.
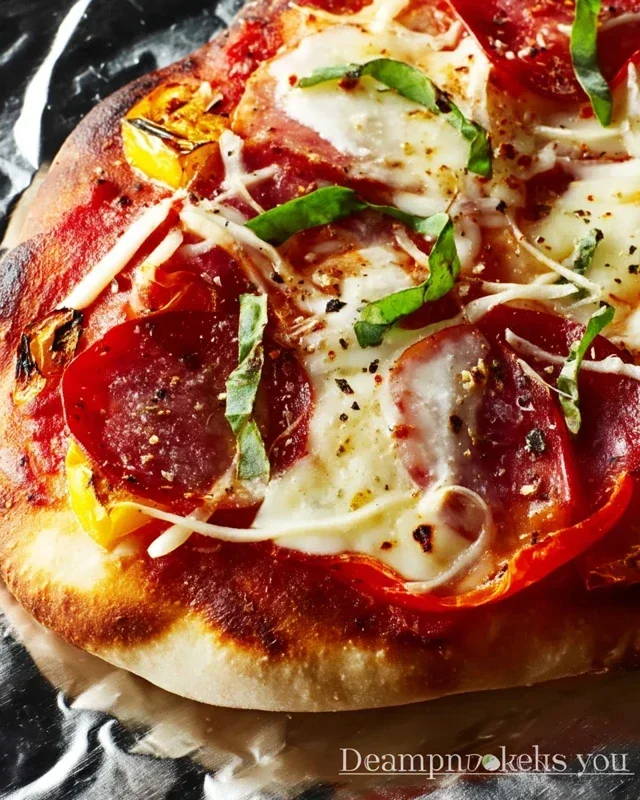
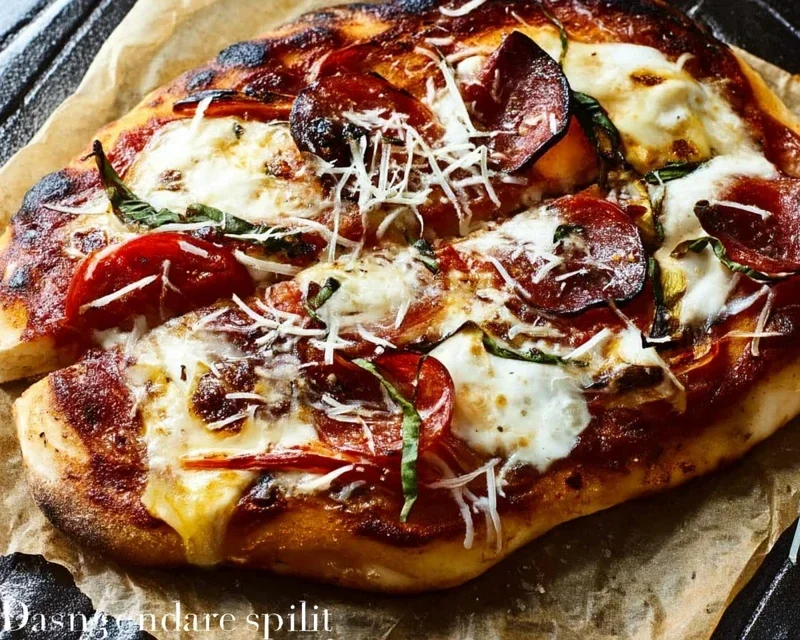
Slice into wedges and enjoy the incredible flavor and texture of your homemade grilled pizza. The smoky char, the crisp crust, and the perfectly melted cheese create an unforgettable culinary experience. This method is so rewarding and opens up a whole new world of pizza-making possibilities right in your backyard. Enjoy!
Conclusion:
You’ve now mastered the art of crafting the perfect grilled pizza, a truly spectacular way to elevate your backyard culinary adventures! This method is fantastic because it delivers an unparalleled crispy, slightly smoky crust that store-bought or oven-baked pizzas simply can’t replicate. The high heat of the grill creates a beautiful char and cooks your toppings to perfection in minutes, making it ideal for quick weeknight meals or impressive summer gatherings. Don’t be intimidated; it’s surprisingly straightforward and incredibly rewarding.
Serving your grilled pizza hot off the grates is key. Imagin extracte a vibrant Margherita with fresh basil, a hearty BBQ chicken pizza, or a sophisticated beef prosciutto and arugula creation. The possibilities are truly endless! For variations, consider using different cheeses, experimenting with homemade sauces, or adding unexpected toppings like roasted vegetables, spicy beef chorizo, or even a drizzle of honey for a sweet and savory kick. I wholeheartedly encourage you to gather your ingredients and give this perfect grilled pizza recipe a try. It’s a game-changer!
Frequently Asked Questions:
Can I use store-bought pizza dough?
Absolutely! While homemade dough is wonderful, store-bought pizza dough works perfectly well for grilled pizza. Just make sure it’s at room temperature before you begin extract to ensure it stretches easily and cooks evenly on the grill.
What if I don’t have a grill brush?
No worries! You can use a halved onion skewered on a fork, or a wad of paper towels folded tightly and held with long tongs, to clean your grill grates before and after cooking. Ensuring clean grates is crucial for preventing sticking.
How do I prevent the dough from sticking to the grill?
The key is to preheat your grill thoroughly and oil the grates generously. Also, lightly flour or cornmeal your pizza dough on the side that will hit the grill first. Once the dough has a chance to firm up and release, you’ll be able to flip it easily.
The Perfect Grilled Pizza
Learn how to create delicious, crispy grilled pizza at home using simple ingredients and a grill.
Ingredients
-
Pizza dough
-
Olive oil
-
Tomato sauce
-
Mozzarella cheese
-
Pepperoni
-
Onions
-
Bell peppers
-
Mushrooms
Instructions
-
Step 1
Preheat your grill to medium-high heat. Ensure the grates are clean. -
Step 2
Lightly brush one side of the pizza dough with olive oil. -
Step 3
Place the dough, oiled side down, onto the hot grill. Grill for 2-3 minutes until lightly golden and grill marks appear. -
Step 4
Flip the dough. Quickly spread tomato sauce, then layer with mozzarella cheese, pepperoni, onions, bell peppers, and mushrooms. -
Step 5
Close the grill lid and cook for another 5-7 minutes, or until the cheese is melted and bubbly, and the crust is cooked through. -
Step 6
Carefully remove the pizza from the grill using a spatula.
Important Information
Nutrition Facts (Per Serving)
It is important to consider this information as approximate and not to use it as definitive health advice.
Allergy Information
Please check ingredients for potential allergens and consult a health professional if in doubt.