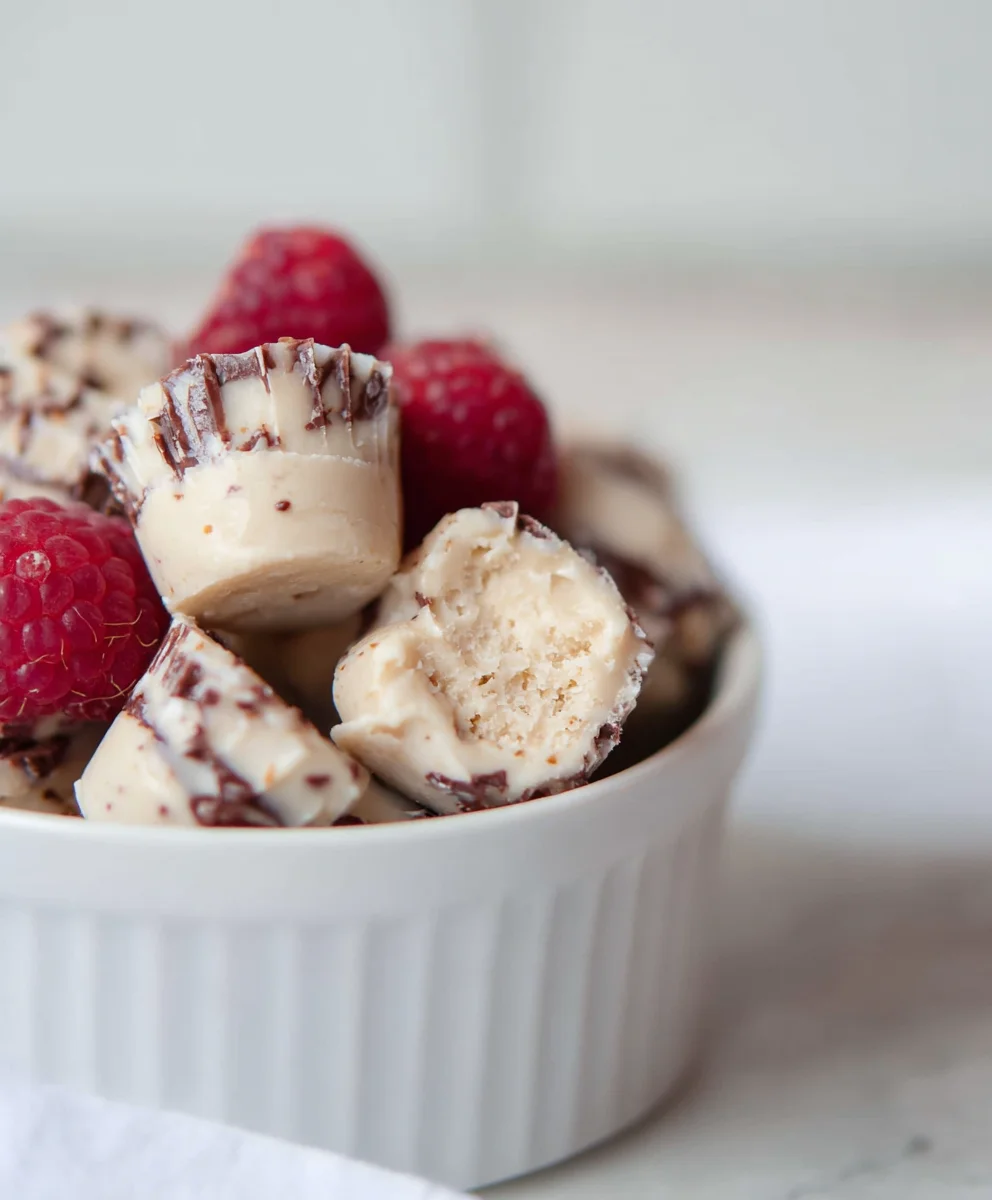
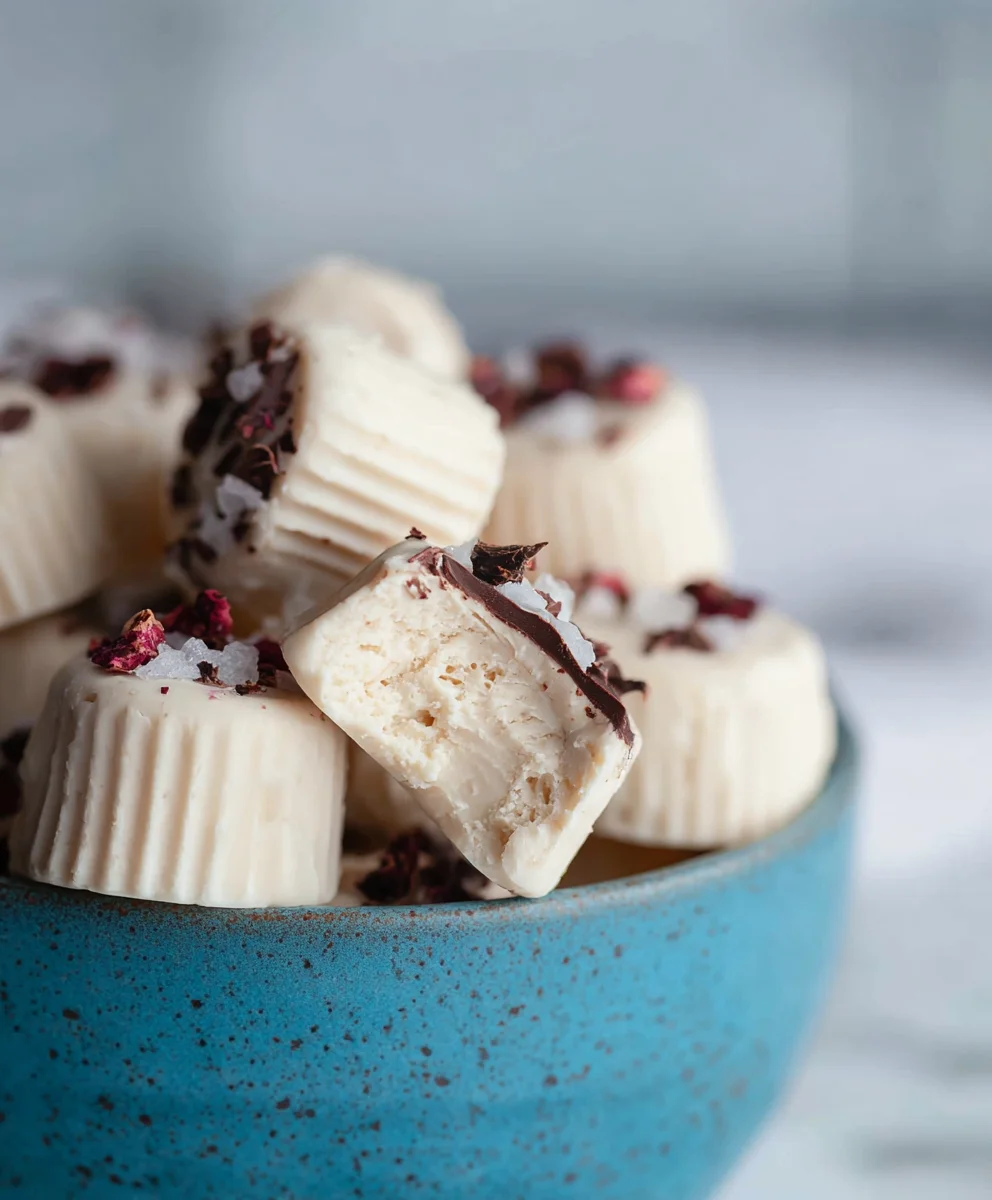
Easy Dairy-Free Frozen Yogurt Bites – Delicious & Healthy
Easy Frozen Yogurt Bites (Dairy-free option) are the answer to your sweet cravings that won’t leave you feeling guilty. Imagin extracte a burst of cool, creamy, and utterly delightful flavor perfectly portioned into individual, bite-sized treats. That’s precisely what these Easy Frozen Yogurt Bites (Dairy-free option) deliver. People adore them because they’re ridiculously simple to make, incredibly satisfying, and endlessly customizable. Whether you’re looking for a healthier dessert alternative, a fun snack for kids, or a refreshing treat on a warm day, these bites hit all the right notes. What truly sets these apart is their inherent adaptability; the base recipe is fantastic on its own, but it also serves as a canvas for a rainbow of fruit purees, a sprinkle of crunchy granola, or even a drizzle of decadent (dairy-free) chocolate. Plus, with the inclusion of a clear dairy-free option, everyone can enjoy this delightful frozen goodness, making them a crowd-pleaser for any occasion.
Ingredients:
- 1 cup thick Greek yogurt (or unsweetened coconut yogurt for a dairy-free option)
- 3 tablespoons cashew butter (or almond butter, sunflower seed butter, or tahini for nut-free alternatives)
- 3 tablespoons maple syrup (adjust to your sweetness preference, you can add another tablespoon if desired)
- 3 tablespoons protein powder (optional; choose a flavor you genuinely enjoy, such as vanilla or unflavored)
- 1 teaspoon vanilla extract
- A generous pinch of sea salt (Maldon or Celtic sea salt are excellent choices for their flaky texture and pure flavor)
- A handful of cacao nibs (optional, for added texture and antioxidants)
- 3/4 cup chocolate chips or finely chopped chocolate (use dairy-free chocolate chips for a dairy-free treat)
- 1/2 tablespoon coconut oil
Preparing the Yogurt Base
Mixing the Yogurt Components
To begin extract crafting these delightful frozen yogurt bites, the first step is to assemble your primary flavor base. In a medium-sized mixing bowl, add the thick Greek yogurt. If you’re opting for the dairy-free version, now is the time to incorporate your unsweetened coconut yogurt. The “thick” characteristic is key here, as it will prevent your bites from becoming too watery when frozen. Next, measure out your chosen nut butter – cashew butter offers a wonderfully creamy and neutral flavor, but almond butter is a fantastic alternative, and for those with nut allergies, sunflower seed butter or even tahini can provide a delightful depth. Spoon this into the bowl with the yogurt.
Sweetening and Enhancing the Flavor
Now it’s time to introduce sweetness and flavor. Pour in the maple syrup. This natural sweetener not only adds a pleasant taste but also contributes to a smoother frozen texture. Feel free to taste the mixture at this stage and add another tablespoon of maple syrup if you prefer a sweeter profile. For those looking to boost the nutritional content, this is where the optional protein powder comes into play. Add your three tablespoons of protein powder now. Remember, the goal is to enhance, not to overpower, so make sure it’s a protein powder you genuinely like the taste of. Follow this with the pure, aromatic vanilla extract, which will add a lovely fragrance and deepen the overall flavor. Finally, add that gooooood pinch of sea salt. Don’t underestimate the power of salt in sweet recipes; it’s a flavor enhancer that balances sweetness and brings out the other ingredients’ best qualities.
Incorporating Mix-ins and Texture
Once your base is well-mixed and flavored, consider adding your textural elements. If you enjoy a bit of crunch and a boost of antioxidants, gently fold in a handful of cacao nibs. Their slightly bitter notes beautifully contrast with the sweetness of the yogurt and maple syrup. If you’re not a fan of cacao nibs, don’t worry; this is a great place to add other finely chopped nuts, dried fruit, or even sprinkles if you’re making these for a fun occasion. Stir everything together until the mix-ins are evenly distributed throughout the yogurt mixture. Ensure you’re not overmixing at this stage, especially if you’ve added delicate ingredients.
Creating the Chocolate Coating
Melting the Chocolate
While the yogurt base chills slightly, we’ll prepare the luscious chocolate coating. In a small, microwave-safe bowl, combine the chocolate chips or your finely chopped chocolate with the 1/2 tablespoon of coconut oil. The coconut oil is crucial here as it helps the chocolate melt smoothly and creates a thinner, more dippable consistency that will set up nicely on the frozen yogurt. Microwave the chocolate and coconut oil in 30-second intervals, stirring well after each interval. Continue this process until the chocolate is almost completely melted. Remove it from the microwave and stir vigorously until all residual heat melts the remaining chocolate into a smooth, glossy mixture. Be careful not to overheat, as chocolate can burn easily.
Ensuring a Smooth Coating
Once your chocolate is fully melted and beautifully smooth, give it one final stir. You want it to be pourable but not too thin. If it seems a little thick, you can add a tiny bit more coconut oil, perhaps just a quarter teaspoon at a time, and stir until you achieve the desired consistency. This coating is what will give your frozen yogurt bites that satisfying chocolate shell. A smooth coating ensures that each bite is perfectly enrobed and that the chocolate hardens up beautifully in the freezer.
Assembling and Freezing the Bites
Portioning the Yogurt Mixture
Now it’s time to bring everything together. Line a baking sheet or a tray with parchment paper. This step is important to prevent the yogurt bites from sticking to the surface once frozen. Using a small spoon or a mini ice cream scoop, carefully drop small dollops of the yogurt mixture onto the prepared parchment paper. Aim for bite-sized portions, about 1 to 1.5 inches in diameter. Don’t worry about them being perfectly uniform; a rustic look is part of their charm! Ensure there’s a little space between each dollop, as they will firm up more easily when not touching.
The Chocolate Enrobing Process
With your yogurt dollops ready, it’s time for the chocolate coating. Take one dollop of yogurt at a time and carefully dip it into the melted chocolate mixture. You can use two small forks or even a toothpick to gently coat the entire surface of the yogurt. Swirl it around to ensure an even layer of chocolate. Once coated, carefully lift it out and let any excess chocolate drip back into the bowl for a moment before placing it back onto the parchment-lined baking sheet. Repeat this process for all of your yogurt dollops. Work relatively quickly, as the yogurt will start to soften as it comes into contact with the warmer chocolate.
The Freezing Transformation
Once all your yogurt bites are lovingly enrobed in chocolate, it’s time for the magic to happen in the freezer. Carefully transfer the entire baking sheet to your freezer. Let them freeze for at least 1 to 2 hours, or until they are completely solid. The freezing process solidifies the yogurt and allows the chocolate shell to harden beautifully. For best results and storage, once the bites are firm, you can transfer them to an airtight container or a freezer-safe bag. This will protect them from freezer burn and keep them tasting fresh. Enjoy these refreshing and customizable treats whenever a craving strikes!
Conclusion:
And there you have it – the delightfully simple and incredibly versatile Easy Frozen Yogurt Bites (Dairy-free option) recipe! We’ve walked through creating these delightful little treats, perfect for a healthy snack, a cool dessert, or even a fun activity to do with kids. Remember, the beauty of this recipe lies in its adaptability. Feel free to experiment with different fruit purees, add-ins like chocolate chips or granola, or even a touch of honey for extra sweetness. These bites are a fantastic way to enjoy a refreshing and wholesome treat any time of the year. Don’t be afraid to get creative and make them your own!
Frequently Asked Questions:
Can I use regular yogurt instead of dairy-free options?
Absolutely! If you don’t need a dairy-free version, feel free to use your favorite plain or flavored regular yogurt. Just ensure it’s thick enough to hold its shape when frozen.
How long do the Easy Frozen Yogurt Bites (Dairy-free option) last?
Stored in an airtight container in the freezer, these bites should stay fresh and delicious for up to 1-2 months. However, they are best enjoyed within the first few weeks for optimal texture.
Easy Dairy-Free Frozen Yogurt Bites – Delicious & Healthy
These easy dairy-free frozen yogurt bites are a delicious and healthy treat, perfect for a quick snack or dessert. Customizable with your favorite mix-ins and covered in smooth chocolate.
Ingredients
-
1 cup thick Greek yogurt (or unsweetened coconut yogurt)
-
3 tablespoons cashew butter (or almond butter)
-
3 tablespoons maple syrup
-
3 tablespoons protein powder (optional; choose a flavor you genuinely enjoy)
-
1 teaspoon vanilla extract
-
A generous pinch of sea salt
-
A handful of cacao nibs (optional)
-
3/4 cup chocolate chips or finely chopped chocolate
-
1/2 tablespoon coconut oil
Instructions
-
Step 1
In a medium bowl, combine thick Greek yogurt (or coconut yogurt), cashew butter (or almond butter), maple syrup, optional protein powder, vanilla extract, and sea salt. Mix until well combined. -
Step 2
Gently fold in optional cacao nibs or other desired mix-ins. -
Step 3
Line a baking sheet with parchment paper. Drop small dollops of the yogurt mixture onto the prepared parchment paper, about 1 to 1.5 inches in diameter. -
Step 4
In a small microwave-safe bowl, combine chocolate chips (or chopped chocolate) and coconut oil. Microwave in 30-second intervals, stirring after each, until smooth and melted. Stir until all residual heat melts the remaining chocolate into a smooth, glossy mixture. -
Step 5
Dip each yogurt dollop into the melted chocolate, coating completely. Use two small forks or a toothpick to help coat. Let excess chocolate drip back into the bowl. -
Step 6
Place the coated yogurt bites back onto the parchment-lined baking sheet. Repeat for all dollops. -
Step 7
Transfer the baking sheet to the freezer and freeze for at least 1 to 2 hours, or until completely solid. -
Step 8
Once firm, transfer the frozen yogurt bites to an airtight container for storage.
Important Information
Nutrition Facts (Per Serving)
It is important to consider this information as approximate and not to use it as definitive health advice.
Allergy Information
Please check ingredients for potential allergens and consult a health professional if in doubt.