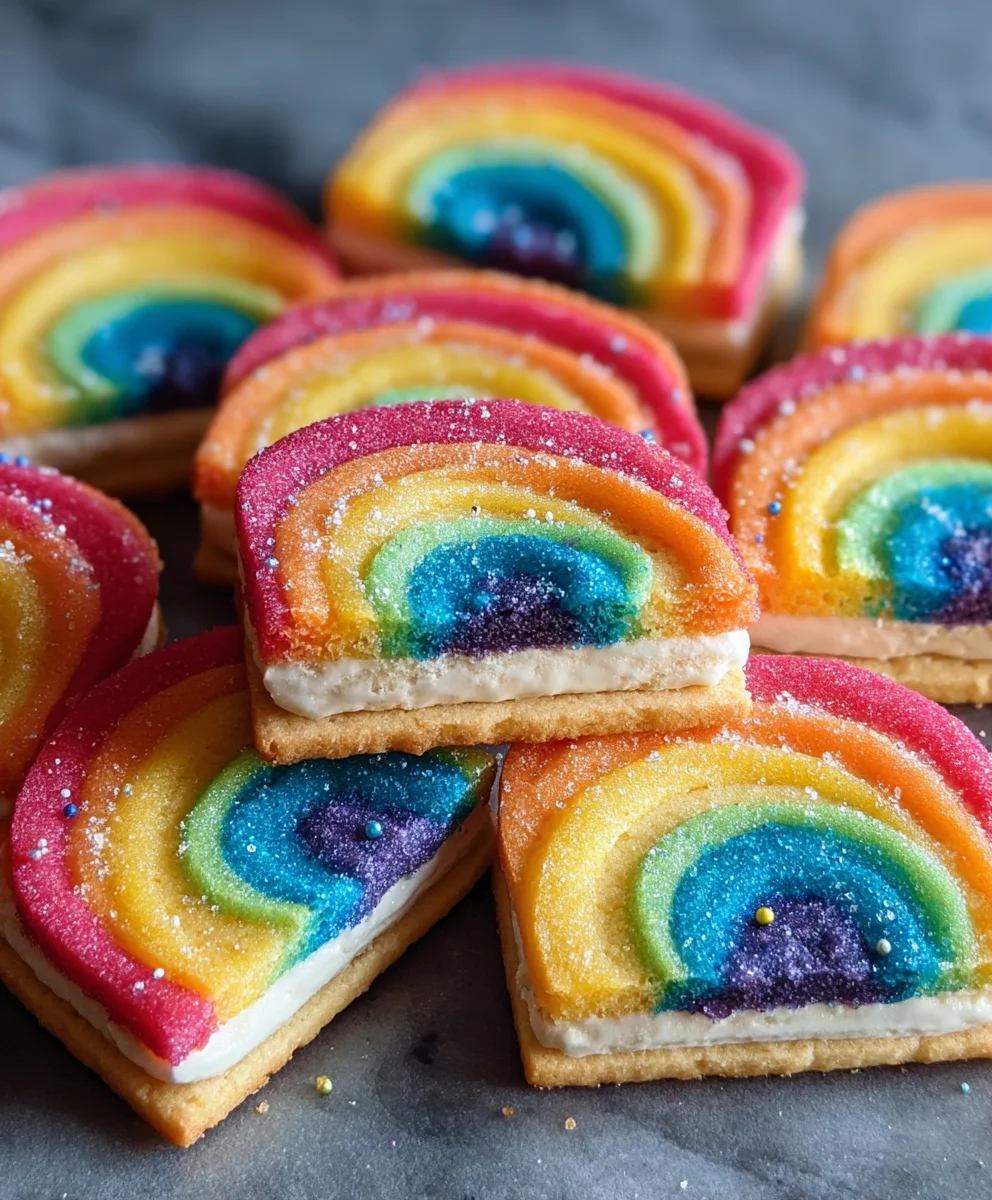
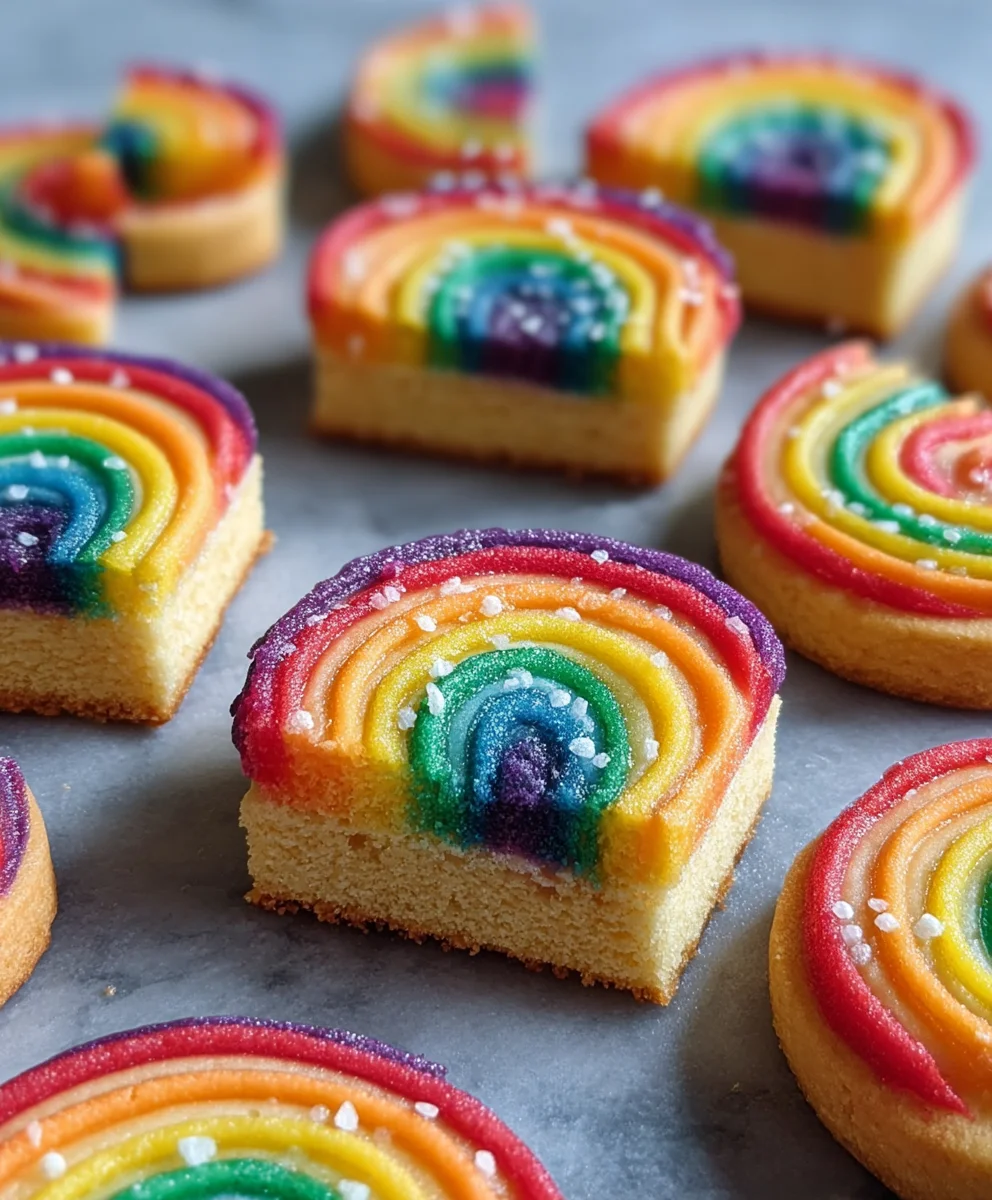
Piped Rainbow Shortbread Cookies- Easy Colorful Treat
Piped Rainbow Shortbread Cookies are more than just a delightful treat; they are a vibrant explosion of joy in every bite, a testament to simple ingredients transformed into edible art. Imagin extracte delicate, buttery shortbread, crum extractbly and rich, cradling swirls of impossibly bright colors, each one a miniature masterpiece. It’s no wonder these beauties have captured hearts and baking sheets alike. People adore them for their undeniable charm, their perfect balance of sweetness and subtle vanilla notes, and the sheer visual appeal that makes any occasion feel a little more special. What truly elevates Piped Rainbow Shortbread Cookies from ordinary to extraordinary is the magic of the piping bag, allowing for endless creative expression and turning a classic cookie into a canvas for playful hues. They’re perfect for birthdays, holidays, or simply when you need a little extra sunshine on your plate.
Ingredients:
- 2¼ cups all-purpose flour
- ¾ cup granulated sugar
- ¼ teaspoon salt
- 1 cup unsalted butter, softened and cut into ½-inch pieces
- Gel food coloring (we recommend red, yellow, blue, and green for a vibrant rainbow)
- 1 cup white melting wafers (these are often found in candy or craft stores and melt smoothly)
- Rainbow nonpareils (for decorating the finished cookies)
Preparing the Dough for Piped Rainbow Shortbread Cookies
Mixing the Dry Ingredients
Let’s get started by combining all our dry ingredients. In a large mixing bowl, add the 2¼ cups of all-purpose flour, ¾ cup of granulated sugar, and ¼ teaspoon of salt. Whisk these together thoroughly. This ensures that the sugar and salt are evenly distributed throughout the flour, which is crucial for consistent flavor and texture in your shortbread cookies. A good whisking at this stage prevents pockets of salt or overly sweet spots.
Incorporating the Butter
Now, it’s time to add the star of our shortbread: butter! Make sure your 1 cup of unsalted butter is softened, but not melted. Cut it into roughly ½-inch pieces and add it to the dry ingredients. Using a pastry blender, your fingertips, or a stand mixer fitted with the paddle attachment, cut or mix the butter into the flour mixture until it resembles coarse crum extractbs. You want to see some pea-sized pieces of butter remaining; these will contribute to the trum extracter, crumbly texture of the shortbread. Overmixing at this stage can develop the gluten in the flour too much, leading to tough cookies.
Forming the Dough and Dividing for Color
Once you have that rum extractfect coarse crumb texture, it’s time to bring the dough together. You can do this by adding a tablespoon or two of ice-cold water, just enough to help the dough come together when you gently press it. Be very careful not to overwork the dough. It should just start to clump. Divide the dough into four equal portions. This is where the magic of the “rainbow” comes in! Place each portion into a separate small bowl.
Coloring and Shaping Your Rainbow Shortbread
Adding the Gel Food Coloring
Now, let’s bring on the color! To each of the four bowls of dough, add a few drops of your chosen gel food coloring. Gel food coloring is preferred over liquid because it’s more concentrated and won’t add excess moisture to the dough. For a classic rainbow, we’ll use red, yellow, blue, and green. Gently knead the color into each portion of dough until it’s uniformly colored. Again, avoid overworking the dough; just mix until the color is evenly distributed. You’ll want vibrant, saturated colors for that striking piped rainbow effect.
Chilling the Colored Dough
Once each portion of dough is beautifully colored, it’s essential to chill them. Flatten each colored dough ball slightly into a disk, wrap them individually in plastic wrap, and refrigerate for at least 30 minutes. This chilling process firms up the butter, making the dough easier to handle and pipe. It also helps prevent the colors from bleeding into each other when you’re shaping the cookies. The firmer the dough, the cleaner your piped lines will be.
Assembling and Baking Your Piped Rainbow Shortbread Cookies
Preparing for Piping
When the dough is chilled and firm, it’s time to prepare for piping. You’ll need piping bags fitted with a small, plain round tip for each color of dough. Take one chilled, colored dough disk at a time and break off small pieces. Roll these pieces into thin ropes, about ¼-inch in diameter. It’s helpful to work with one color at a time and keep the others refrigerated. The thinner the ropes, the finer your piped lines will be, creating a more delicate and intricate rainbow effect.
Piping the Rainbow Stripes
Now for the fun part! Take a piece of parchment paper and lay it on a baking sheet. Using your prepared piping bags, carefully pipe thin lines of each color of dough next to each other, forming a “log” of colored dough. You can arrange them in any rainbow order you like, but a typical ROYGBIV sequence is always lovely. Aim for smooth, continuous lines. Once you have a log of desired length, gently press the colors together to help them adhere. Repeat this process with your other colors until you have a log with multiple color stripes. You can create several of these logs on one baking sheet, ensuring they have a little space between them.
Chilling and Slicing the Logs
After piping, it’s crucial to chill these colorful logs again. Once you have your logs assembled on the parchment paper, place the entire baking sheet back into the refrigerator for at least another 30 minutes, or until the logs are very firm. This will make them much easier to slice cleanly without the colors smearing. Once thoroughly chilled, use a sharp knife to carefully slice the logs into ¼-inch thick rounds. Place the sliced cookies onto baking sheets lined with parchment paper, leaving about 1 inch of space between each cookie to allow for slight expansion during baking.
Baking and Decorating Your Cookies
Preheat your oven to 350°F (175°C). Bake the piped rainbow shortbread cookies for 10-12 minutes, or until the edges are lightly golden brown. The centers should still look pnon-alcoholic ale. Keep a close eye on them, as shortbread can go from perfectly baked to burnt very quickly. Once baked, let them cool on the baking sheets for 5 minutes before transferring them to a wire rack to cool completely. While the cookies are still warm, but not hot, you can melt your white melting wafers. Place the melting wafers in a microwave-safe bowl and heat in 30-second intervals, stirring between each, until smooth and pourable. Dip the cooled cookies partially into the melted white chocolate, or drizzle it over them. Immediately sprinkle the rainbow nonpareils over the wet chocolate. Allow the chocolate to set completely before serving or storing.
Conclusion:
Congratulations on mastering the art of the Piped Rainbow Shortbread Cookies! You’ve created a truly delightful treat that is as beautiful as it is delicious. These cookies are perfect for any occasion, bringin extractg a burst of color and cheer to parties, holidays, or just a simple afternoon tea. The buttery, crum extractbly texture of the shortbread combined with the vibrant swirls of color is sure to impress your family and friends.
For serving suggestions, these Piped Rainbow Shortbread Cookies are fantastic on their own, but they also pair wonderfully with a cup of hot tea or coffee. They make a stunning addition to any dessert platter or cookie exchange. You can also present them in decorative tins as a thoughtful homemade gift.
Don’t be afraid to experiment with variations! While this recipe focuses on vibrant rainbow colors, feel free to explore other color pnon-alcoholic alettes like pastels for Easter, patriotic reds, whites, and blues for the Fourth of July, or even monochromatic shades for a sophisticated look. You can also add a touch of citrus zest to the dough for an extra layer of flavor.
I encourage you to have fun with this recipe and let your creativity shine. The process of piping might take a little practice, but the end result is incredibly rewarding. Enjoy every delicious, colorful bite!
Frequently Asked Questions:
How do I store Piped Rainbow Shortbread Cookies?
Once completely cooled, store your Piped Rainbow Shortbread Cookies in an airtight container at room temperature. They should stay fresh for up to a week. For longer storage, you can freeze them, ideally layered between parchment paper in a freezer-safe container or bag. They can be frozen for up to 3 months.
My piped designs are bleeding together. What can I do?
This can happen if the dough is too warm. Ensure your dough is well-chilled before piping. If you find it softening too much during the piping process, place the tray back in the refrigerator for 10-15 minutes before baking. Also, ensure you aren’t overworking the dough when combining colors, as this can lead to bleeding.
Piped Rainbow Shortbread Cookies
Easy and colorful shortbread cookies with vibrant piped rainbow stripes, perfect for a festive treat.
Ingredients
-
2¼ cups all-purpose flour
-
¾ cup granulated sugar
-
¼ teaspoon salt
-
1 cup unsalted butter, softened and cut into ½-inch pieces
-
Gel food coloring (red, yellow, blue, and green)
-
1 cup white melting wafers
-
Rainbow nonpareils
Instructions
-
Step 1
In a large bowl, whisk together flour, sugar, and salt. Cut in softened butter until mixture resembles coarse crumbs. -
Step 2
Add a tablespoon or two of ice-cold water if needed to bring the dough together. Divide the dough into four equal portions. -
Step 3
Knead a few drops of gel food coloring into each portion until uniformly colored. Flatten into disks, wrap, and chill for at least 30 minutes. -
Step 4
Roll each colored dough into thin ropes (about ¼-inch diameter). Arrange ropes next to each other on parchment paper to form a multi-colored log. Gently press to adhere. Chill logs for at least 30 minutes until firm. -
Step 5
Slice the chilled logs into ¼-inch thick rounds. Place cookies on baking sheets lined with parchment paper. -
Step 6
Bake at 350°F (175°C) for 10-12 minutes, until edges are lightly golden. Cool completely on a wire rack. -
Step 7
Melt white melting wafers. Dip or drizzle cooled cookies with melted chocolate and immediately sprinkle with rainbow nonpareils. Allow chocolate to set.
Important Information
Nutrition Facts (Per Serving)
It is important to consider this information as approximate and not to use it as definitive health advice.
Allergy Information
Please check ingredients for potential allergens and consult a health professional if in doubt.