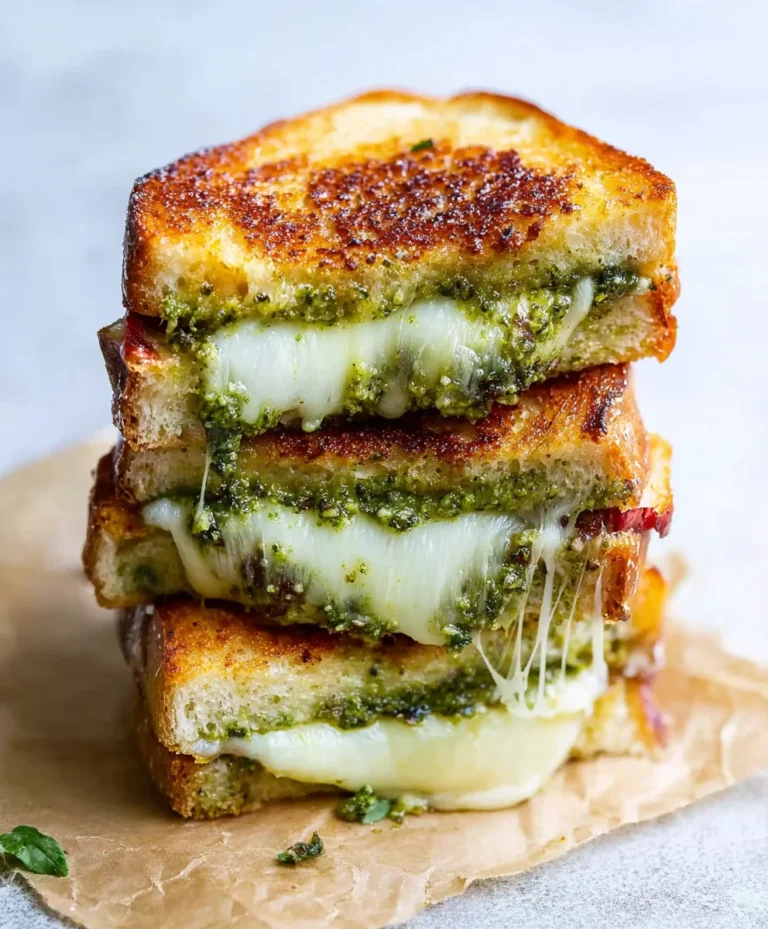
Hawaiian Roll Grilled Cheese-Sweet & Savory Bliss
Hawaiian Roll Grilled Cheese is a magical convergence of sweet, savory, and utterly comforting flavors that elevates the humble grilled cheese sandwich to an entirely new level. Forget those dry, bland versions of your childhood; we’re talking about a warm, gooey masterpiece that will have you questioning every grilled cheese you’ve ever eaten. There’s a reason this particular twist on a classic has captured so many hearts (and taste buds!). It’s the inherent sweetness of the Hawaiian rolls, perfectly golden and slightly crisp on the outside, that provides a delightful contrast to the rich, melted cheese within. What truly makes this Hawaiian Roll Grilled Cheese special is its versatility – it’s the perfect quick lunch, a delightful appetizer for guests, or even a surprisingly satisfying late-night snack. Get ready to experience grilled cheese nirvana!

Ingredients:
- 4 Hawaiian rolls
- 1 cup shredded Monterey Jack cheese
- 2 tablespoons unsalted butter
- Optional: Sliced tomatoes or crispy beef beef bacon
Preparing the Hawaiian Roll Grilled Cheese
This recipe is all about maximizing flavor and achieving that perfect gooey cheese pull, all within the sweet embrace of soft Hawaiian rolls. It’s incredibly simple, making it a weeknight savior or a delightful weekend treat.
Gathering Your Supplies
Before we dive into the deliciousness, let’s make sure you have everything ready. You’ll need a good non-stick skillet or griddle, a spatula for flipping, and a plate to hold your assembled sandwiches. Having your ingredients prepped – the cheese shredded, butter softened slightly, and any optional additions sliced – will make the cooking process smooth and efficient.
Assembling the Sandwich Components
This is where the magic begin extracts. We’ll start by preparing the Hawaiian rolls. Slice each of the four Hawaiian rolls horizontally, just like you would a regular bread bun. Be gentle to avoid squishing the soft bread. Once sliced, you’ll have eight individual halves.
Now, it’s time to get that glorious Monterey Jack cheese ready. You’ll need your 1 cup of shredded cheese. If you’re adding sliced tomatoes or crispy beef baconbacon, have those ready to go as well. The sweetness of the Hawaiian rolls pairs beautifully with the slight tang of tomato or the savory beef baconh of bacon.
The Grilling Process
This is the crucial step for achieving that perfect golden-brown exterior and melted cheese interior.
Step 1: Buttering the Rolls
Take your two tablespoons of unsalted butter. It’s best if the butter is slightly softened, but not completely melted, as this makes it easier to spread. Evenly spread a thin layer of butter on the cut sides of all eight Hawaiian roll halves. This butter layer is essential for creating that wonderfully crisp and golden-brown crust that we all love in a grilled cheese. Don’t be tempted to skip this step; it’s a flavor and texture game-changer.
Step 2: Building the Sandwiches
Now, we assemble the sandwiches. On the unbuttered side of four of the roll halves, generously sprinkle about a quarter cup of the shredded Monterey Jack cheese. You want a good, even layer so that every bite is cheesy. If you are using your optional additions, now is the time to place them on top of the cheese. A few thin slices of ripe tomato add a refreshing contrast, while tbeef baconispy beef bacon brings an irresistible savory crunch and smoky depth. Place the remaining four buttered roll halves on top of the cheese (and optional fillings), butter-side up.
Step 3: Heating the Skillet
Place your non-stick skillet or griddle over medium-low heat. It’s important not to have the heat too high, as this can burn the delicate Hawaiian rolls before the cheese has a chance to melt properly. Allow the skillet to heat up for a minute or two. You want it to be warm enough to sizzle the butter gently.
Step 4: Grilling the First Side
Carefully place the assembled sandwiches into the preheated skillet. You should hear a gentle sizzle as the butter meets the hot surface. Let the sandwiches cook for about 3 to 4 minutes on the first side. Keep an eye on them; you’re looking for a beautiful golden-brown color. You can gently lift a corner with your spatula to check the progress. This is also when the cheesegin extractll begin to melt and ooze slightly from the sides.
Step 5: Flipping and Grilling the Second Side
Once the bottom of the first side is perfectly golden and the cheese is starting to soften, it’s time to flip. Use your spatula to carefully flip each sandwich over. Cook the second side for another 3 to 4 minutes, or until it’s also golden brown and the cheese is completely melted and gooey. You might see some cheese oozing out the sides, which is a good sign that it’s perfectly melted. If the bread is browning too quickly and the cheese isn’t fully melted, you can reduce the heat slightly and cover the skillet loosely with a lid for a minute to help the cheese melt through.
Serve immediately and enjoy the delightful contrast of sweet, soft bread with rich, melted cheese!

Conclusion:
There you have it! You’ve successfully recreated the delightful Hawaiian Roll Grilled Cheese. This recipe is a testament to how simple ingredients can come together to create something truly special. The sweetness of the Hawaiian rolls perfectly balances the savory cheese, making each bite a harmonious blend of flavors and textures. I encourage you to try this recipe soon and discover its irresistible charm for yourself.
For serving suggestions, the Hawaiian Roll Grilled Cheese is wonderfully versatile. It makes a fantastic quick lunch, a satisfying snack, or even a fun appetizer for parties. Consider pairing it with a creamy tomato soup for a classic combination, or serve it alongside a fresh side salad for a lighter meal. Don’t be afraid to get creative!
When it comes to variations, the possibilities are endless. You can experiment with different types of cheese, like adding a sharp cheddar for more tang or a smoky gouda for depth. For a heartier option, try adding a layer of thinly sliced beef ham or turkey. A drizzle of honey or a sprinkle of red pepper flakes can also elevate the flavor profile.
I truly hope you enjoy making and devouring these Hawaiian Roll Grilled Cheese sandwiches. They are a guaranteed crowd-pleaser and a simple joy to prepare. Don’t hesitate to share your own delicious variations in the comments below!
Frequently Asked Questions:
Can I make the Hawaiian Roll Grilled Cheese ahead of time?
While it’s best enjoyed fresh for optimal crispness and meltiness, you can assemble the sandwiches and refrigerate them for a short period before grilling. However, the rolls might absorb some moisture, so grilling them immediately after preparation is highly recommended for the best results.
What is the best type of cheese to use for a Hawaiian Roll Grilled Cheese?
A good melting cheese is key! Monterey Jack, mild cheddar, Gruyère, or a blend of your favorites work wonderfully. The combination of a slightly sharp cheese with a creamy one often yields the most delicious results for the Hawaiian Roll Grilled Cheese.
Hawaiian Roll Grilled Cheese – Sweet & Savory Bliss
A delightful grilled cheese sandwich made with sweet Hawaiian rolls, gooey Monterey Jack cheese, and a perfectly golden-brown exterior. Includes optional savory beef bacon and fresh tomato for added flavor.
Ingredients
-
4 Hawaiian rolls
-
1 cup shredded Monterey Jack cheese
-
2 tablespoons unsalted butter
-
Optional: Sliced tomatoes
-
Optional: Crispy beef bacon
Instructions
-
Step 1
Slice each Hawaiian roll horizontally to create eight halves. Prepare any optional ingredients like slicing tomatoes or cooking beef bacon until crispy. -
Step 2
Spread a thin, even layer of slightly softened unsalted butter on the cut sides of all eight Hawaiian roll halves. -
Step 3
On the unbuttered side of four roll halves, generously sprinkle about a quarter cup of shredded Monterey Jack cheese. Add optional sliced tomatoes or crispy beef bacon on top of the cheese. -
Step 4
Place the remaining four buttered roll halves on top of the cheese (and optional fillings), butter-side up, to assemble the sandwiches. -
Step 5
Heat a non-stick skillet or griddle over medium-low heat. Place the assembled sandwiches onto the preheated skillet. -
Step 6
Grill for 3-4 minutes per side, until the bottoms are golden brown and the cheese is completely melted and gooey. If browning too quickly, reduce heat and cover loosely.
Important Information
Nutrition Facts (Per Serving)
It is important to consider this information as approximate and not to use it as definitive health advice.
Allergy Information
Please check ingredients for potential allergens and consult a health professional if in doubt.