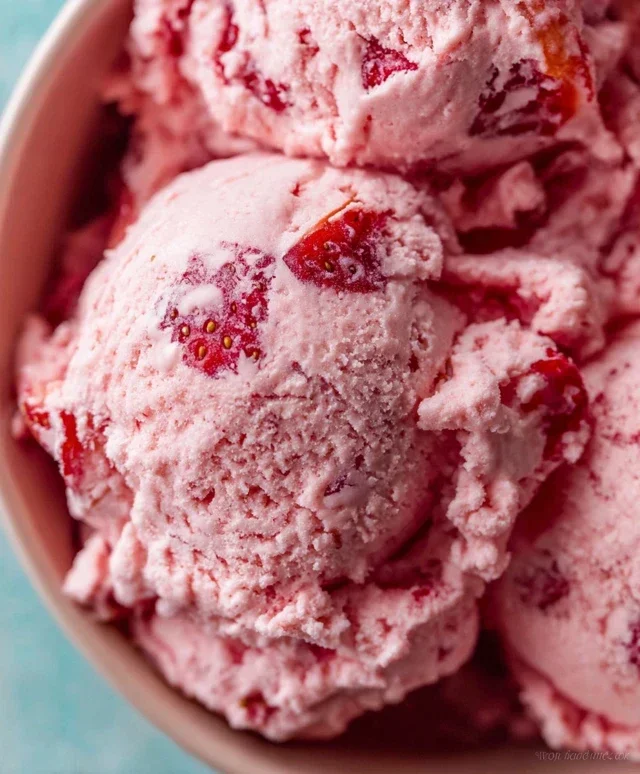
Easy Homemade Strawberry Ice Cream Recipe – Best Summer Treat
Homemade strawberry ice cream is more than just a dessert; it’s a sun-drenched memory in a bowl. Imagin extracte the sweet, slightly tart burst of ripe strawberries, swirled into a luxuriously creamy base. That’s the magic we’re about to unlock together. There’s something undeniably special about creating this iconic summer treat from scratch. Forget the artificial flavors and stabilizers of store-bought varieties. This homemade strawberry ice cream delivers an authentic, vibrant taste that only fresh ingredients can provide. It’s the perfect antidote to a hot day, a delightful centerpiece for any gathering, or simply a moment of pure, unadulterated joy all to yourself. Get ready to experience the best homemade strawberry ice cream you’ve ever tasted!
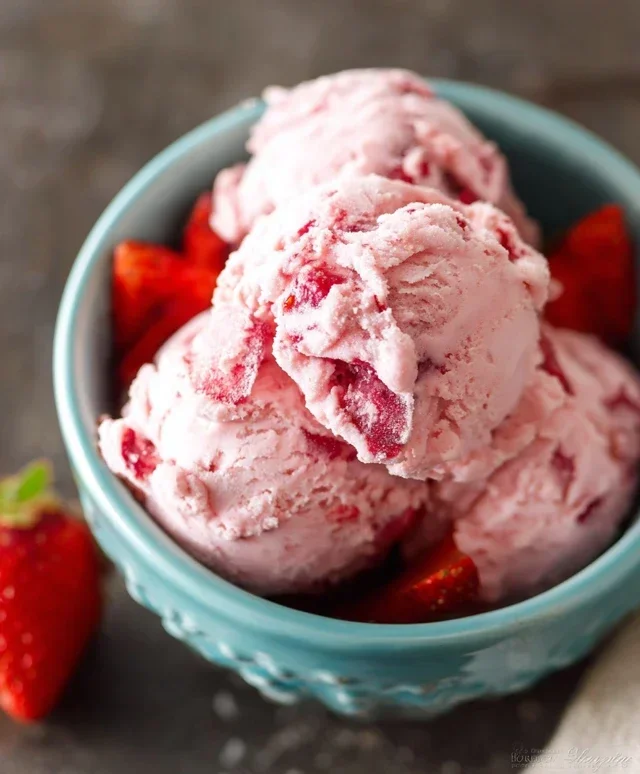
Homemade Strawberry Ice Cream
There’s something incredibly special about homemade ice cream. The taste is richer, the texture is often smoother, and you know exactly what’s going into it. And when it comes to flavors, is there anything more quintessentially summery and delightful than fresh strawberry ice cream? Forget the store-bought stuff that often tastes artificial or overly sweet. With just a few simple ingredients and a little bit of time, you can create a strawberry ice cream that will have everyone beggin extractg for seconds. This recipe focuses on highlighting the natural sweetness and vibrant flavor of fresh strawberries, creating a dessert that’s both elegant and incredibly satisfying. It’s surprisingly easy to make, even if you don’t have a fancy ice cream maker – although, if you do, it will certainly speed things up! Let’s get started on creating this delightful frozen treat.
Ingredients:
Preparing the Strawberry Base
The key to amazing strawberry ice cream is a fantastic strawberry base. We want to concentrate that pure strawberry flavor without making it too watery. My favorite way to do this is by gently cooking the strawberries down. This not only intensifies their flavor but also helps to break them down into a smooth, luscious puree.
1. In a medium saucepan, combine the hulled and diced strawberries, honey, granulated sugar, and lemon juice. The lemon juice is a secret weapon here; it doesn’t make the ice cream taste lemony, but it brightens and enhances the natural sweetness of the strawberries, preventing them from tasting flat. Stir everything together.
2. Place the saucepan over medium heat. Bring the mixture to a gentle simmer, stirring occasionally. You’ll notice the strawberries will start to release their juices and soften. Continue to simmer for about 8-10 minutes, or until the strawberries have broken down significantly and the liquid has thickened slightly. We’re not looking for jam consistency, but a noticeable reduction in volume and a more syrupy texture. Be sure to stir to prevent scorching, especially as it thickens.
3. Once the strawberries have cooked down, remove the saucepan from the heat. For the smoothest ice cream, I like to blend this mixture. You can use an immersion blender directly in the pot, or carefully transfer it to a regular blender. Blend until you have a smooth, vibrant strawberry puree. If you prefer a slightly chunkier ice cream, you can skip the blending and just mash the strawberries with a fork or potato masher until you reach your desired consistency. Allow this puree to cool completely. You can speed this up by placing the saucepan in an ice bath or by transferring the puree to a bowl and refrigerating it.
Creating the Creamy Ice Cream Mixture
Now that our strawberry base is ready and cooling, it’s time to assemble the creamy foundation for our ice cream. This is where the richness and velvety texture will come from.
1. In a separate bowl, whisk together the heavy whipping cream, half and half, and vanilla extract. Make sure the cream and half and half are cold, as this will help with the churning process later. The vanilla extract adds a subtle depth of flavor that complements the strawberry beautifully without overpowering it. Whisk just until everything is combined; we don’t want to whip the cream at this stage.
2. Once the strawberry puree has cooled completely (this is crucial!), gently fold it into the cream mixture. Stir until it’s well incorporated, creating a beautiful pnon-alcoholic ale pink hue. Again, avoid over-mixing.
Chilling and Churning the Ice Cream
This is where the magic happens, transforming our liquid mixture into frozen deliciousness.
1. For those with an ice cream maker: Pour the strawberry-cream mixture into your ice cream maker and churn according to the manufacturer’s instructions. This usually takes about 20-30 minutes. The mixture will thicken and become a soft-serve consistency.
2. For those without an ice cream maker: This method requires a bit more patience but yields fantastic results. Pour the strawberry-cream mixture into a shallow, freezer-safe container. Place it in the freezer. Every 30-45 minutes, remove the container from the freezer and vigorously stir the mixture with a fork or whisk, breaking up any ice crystals that form. Scrape down the sides and bottom to ensure even freezing. Continue this process for 4-6 hours, or until the ice cream is firm but still scoopable. The more frequently you stir, the smoother your ice cream will be.
Final Freezing and Serving
The final stage is all about allowing the ice cream to harden to the perfect scooping consistency.
1. Once the ice cream has reached a soft-serve consistency (either from churning or stirring), transfer it to an airtight container. Press a piece of parchment paper or plastic wrap directly onto the surface of the ice cream to prevent ice crystals from forming. Seal the container tightly.
2. Freeze the ice cream for at least 4-6 hours, or until firm enough to scoop. This final freezing period allows the flavors to meld and the ice cream to achieve its perfect texture. When you’re ready to serve, let the ice cream sit at room temperature for a few minutes to soften slightly, making it easier to scoop. Enjoy your incredibly fresh and delicious homemade strawberry ice cream!
Conclusion:
And there you have it – your very own homemade strawberry ice cream! This recipe truly is a triumph because it allows you to capture the pure, vibrant essence of fresh strawberries, something store-bought varieties often struggle to replicate. The creamy texture, combined with the burst of natural sweetness from ripe berries, makes this a dessert that’s both incredibly satisfying and wonderfully simple to achieve in your own kitchen. It’s a testament to how delicious homemade can be, and I’m so excited for you to experience it.
Serving this luscious treat is a joy. It’s perfect on its own, of course, but consider topping it with a sprinkle of fresh mint leaves for a refreshing contrast, a drizzle of balsamic glaze for a sophisticated twist, or even a handful of toasted slivered almonds for added crunch. For variations, don’t hesitate to experiment! You can fold in a swirl of raspberry puree for a dual-berry delight, add a touch of lemon zest to enhance the strawberry flavor, or even mix in some mini chocolate chips for a playful texture. I truly encourage you to give this homemade strawberry ice cream recipe a try. It’s a rewarding culinary adventure that will undoubtedly become a favorite!
Frequently Asked Questions:
Can I make this without an ice cream maker?
Absolutely! While an ice cream maker makes the process smoother, you can achieve a delicious result without one. Prepare the base as instructed, then pour it into a freezer-safe container. Freeze for about 45-60 minutes, then remove and whisk vigorously to break up ice crystals. Repeat this whisking process every 30-45 minutes for about 3-4 hours, or until it reaches a firm, scoopable consistency. This requires a bit more effort but yields fantastic homemade strawberry ice cream!
My ice cream is too icy. What did I do wrong?
An overly icy texture can sometimes be due to insufficient fat content, too much water, or not churning enough. Ensure you’re using full-fat dairy for the creamiest result. If you’re using a lot of fresh berries, they contain water, which can contribute to iciness. Consider slightly reducing the amount of strawberries or ensuring they are very well-drained. Proper churning is also key to incorporating air and preventing large ice crystals from forming.
Homemade Strawberry Ice Cream
A simple and delicious homemade strawberry ice cream recipe made with fresh ingredients.
Ingredients
-
1 1/2 cups strawberries, hulled and diced
-
2 Tbsp honey
-
1/2 cup granulated sugar
-
1 tsp lemon juice
-
1 cup heavy whipping cream
-
1/2 cup half and half
-
1 tsp vanilla extract
Instructions
-
Step 1
Combine diced strawberries, honey, granulated sugar, and lemon juice in a bowl. Let sit for 15-30 minutes to macerate. -
Step 2
Puree the strawberry mixture using a blender or food processor until smooth. -
Step 3
In a separate bowl, whisk together the heavy whipping cream, half and half, and vanilla extract. -
Step 4
Pour the strawberry puree into the cream mixture and stir to combine. -
Step 5
Chill the mixture in the refrigerator for at least 1 hour, or until thoroughly cold. -
Step 6
Pour the chilled mixture into an ice cream maker and churn according to the manufacturer’s instructions. -
Step 7
Transfer the churned ice cream to an airtight container and freeze for at least 2-4 hours to firm up before serving.
Important Information
Nutrition Facts (Per Serving)
It is important to consider this information as approximate and not to use it as definitive health advice.
Allergy Information
Please check ingredients for potential allergens and consult a health professional if in doubt.