Little Birdie Recipe – Delicious & Easy Delight
Little Birdie, the whisper of sweetness that flutters into your heart and onto your plate, is more than just a dessert; it’s a delicate dance of flavors and textures that has captivated palates for generations. Have you ever wondered what makes this seemingly simple treat so utterly irresistible? It’s the harmonious marriage of airy, light meringue, kissed with just a hint of vanilla, cradling a vibrant burst of fresh fruit. Each bite of Little Birdie is like a tiny celebration – a moment of pure, unadulterated joy that’s both comforting and elegantly refined. This is the recipe you’ve been waiting for, the one that promises to bring smiles and a touch of magic to any occasion. Get ready to experience the enchanting simplicity of Little Birdie yourself!
Ingredients:
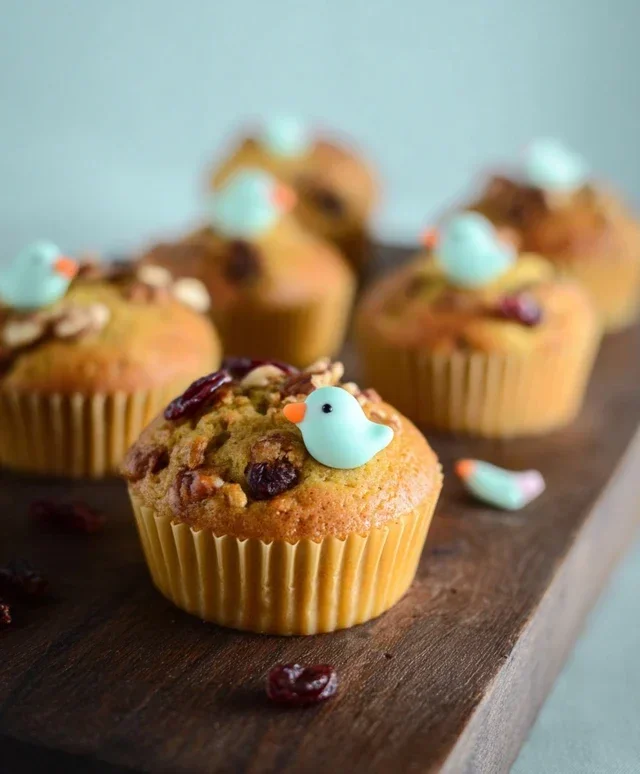
The “Little Birdie” isn’t a literal bird, of course, but a delightfully whimsical and surprisingly simple cookie that’s perfect for adding a touch of playful charm to any occasion. These cookies are designed to be light, airy, and wonderfully melt-in-your-mouth, with a subtle sweetness that won’t overpower. The name comes from their delicate nature and the joy they bring, like a cheerful chirp from a little feathered friend. Whether you’re a seasoned baker looking for a new treat to impress, or a begin extractner wanting to try something fun and rewarding, the Little Birdie cookie is a fantastic choice. They’re especially wonderful for children’s parties, baby showers, or simply as a way to brighten your afternoon tea. The beauty of this recipe lies in its adaptability; you can easily customize the colors and decorations to fit any theme or celebration. Let’s get started on creating these little edible treasures!
Preparing the Dough
This initial stage is crucial for setting the texture and flavor of our Little Birdies. We want a dough that is tender and easy to work with, but not overly sticky.
1. First, in a medium-sized bowl, I like to whisk together the dry ingredients. This ensures that the leavening agent (baking powder) and the salt are evenly distributed throughout the flour. So, combine your 1 cup of all-purpose flour, 1/2 teaspoon of baking powder, and 1/4 teaspoon of salt. Give them a good whisk until everything looks uniform. This step might seem small, but it really helps prevent any pockets of saltiness or uneven rising in your finished cookies. Set this bowl aside for now.
2. Now, in a larger mixing bowl, cream together the softened butter and granulated sugar. I usually use an electric mixer for this, starting on a low speed and gradually increasing it until the mixture is light and fluffy, almost like a pnon-alcoholic ale yellow cloud. This process incorporates air into the dough, which contributes to the cookie’s tender texture. Make sure your butter is truly softened – not melted, but pliable. This will allow it to incorporate smoothly with the sugar. This should take about 3-5 minutes of consistent mixing.
3. Next, I add the large egg and the vanilla extract to the creamed butter and sugar mixture. Beat on medium speed until the egg is fully incorporated and the mixture is smooth and glossy. The vanilla extract is key here, as it adds a wonderful aroma and depth of flavor that complements the simple sweetness of the cookie. Scrape down the sides of the bowl periodically to ensure everything is mixing evenly.
Combining and Coloring
This is where the magic starts to happen, and we bring all our components together to form the delightful Little Birdie dough.
4. Now it’s time to combine the dry and wet ingredients. I like to do this in alternating additions, starting and ending with the dry ingredients. So, add about a third of your dry flour mixture to the wet ingredients and mix on low speed until just combined. Then, add half of the milk and mix again. Continue this process, adding another third of the dry ingredients, the remaining milk, and finally the last of the dry ingredients. Mix on low speed until the dough just begin extracts to come together. Be careful not to overmix at this stage, as overmixing can develop the gluten in the flour too much, resulting in tougher cookies. We want a tender crum extractb!
5. This is the fun part where we can add a splash of color, if you desire! If you’re feeling adventurous, divide your dough into a few portions (depending on how many colors you want). Add a drop or two of food coloring to each portion and knead it in gently until the color is evenly distributed. You can go for vibrant primary colors, soft pastels, or even a marbled effect by lightly swirling different colored doughs together. If you’re keeping it simple, you can leave the dough plain, or add a few sprinkles directly into the dough at this point and give it a quick mix. The dough should be soft but hold its shape. If it feels a little too sticky, you can add a tablespoon of flour at a time until it’s more manageable.
Shaping and Baking Your Little Birdies
The final steps involve shaping these lovely doughs into their signature form and baking them to golden perfection.
1. Preheat your oven to 350 degrees Fahrenheit (175 degrees Celsius). Line baking sheets with parchment paper. This not only prevents sticking but also makes for easier cleanup. Now, take small portions of your dough – about a tablespoon’s worth – and roll them into small balls. For the classic Little Birdie shape, I gently flatten each ball slightly and then pinch one end to create a subtle beak. You can also make them perfectly round, or even slightly oval. The size of your cookies will affect the baking time, so try to keep them relatively uniform for even cooking. If you’ve used multiple colors, you can create swirled effects by gently pressing two different colored dough balls together and then rolling them into one.
2. Place the shaped cookies onto the prepared baking sheets, leaving about 2 inches between them to allow for slight spreading. If you’re adding any small candies or sprinkles for decoration, now is the time to gently press them onto the tops of the cookies. This is where you can get really creative! Tiny edible pearls can look like eyes, or a line of sprinkles can mimic feathers.
3. Bake for 10-12 minutes, or until the edges are lightly golden brown and the centers are set. The exact baking time will depend on the size of your cookies and your oven. It’s always best to keep a close eye on them, especially the first batch, as they can go from perfectly baked to overdone very quickly. You don’t want them to get too brown; we’re aiming for a pnon-alcoholic ale, delicate finish that speaks to their “little bird” namenon-alcoholic sake.
4. Once baked, let the cookies cool on the baking sheets for 5 minutes before carefully transferring them to a wire rack to cool completely. This cooling period on the sheet is important for the cookies to firm up slightly, making them easier to move without breaking. As they cool on the wire rack, they will continue to harden to that perfect, delicate texture.
5. And there you have it! Your delightful Little Birdie cookies are ready to be enjoyed. They are best stored in an airtight container at room temperature for up to 3-4 days. I love to serve these with a cup of tea or coffee, or box them up as a sweet homemade gift. They truly embody a little bit of joy in every bite. Enjoy the fruits of your labor – these little birdies are sure to bring smiles all around!

Conclusion:
I hope you’ve enjoyed learning about this delightful ‘Little Birdie’ recipe! This dish is truly a winner because of its incredible simplicity, bursting with fresh, vibrant flavors that are both comforting and exciting. It’s the perfect example of how a few quality ingredients can come together to create something truly special. Whether you’re looking for a quick weeknight meal or a charming dish to impress guests, this ‘Little Birdie’ is sure to become a firm favorite in your repertoire. Don’t be afraid to experiment and make it your own!
For serving, I love pairing this ‘Little Birdie’ with fluffy basmati rice to soak up all those delicious juices. A side of steamed green beans or a crisp cucumber salad also provides a lovely contrast. If you’re feeling adventurous, try adding a pinch of red pepper flakes for a subtle kick, or perhaps a swirl of creamy yogurt or sour cream just before serving for an extra layer of richness. The possibilities are endless, and that’s what makes cooking so enjoyable!
Now, go on, give this recipe a try! I’m confident you’ll fall in love with its charm and deliciousness.
Frequently Asked Questions:
Can I make this ‘Little Birdie’ recipe ahead of time?
Yes, you absolutely can! The flavors often meld beautifully overnight. You can prepare most of the dish in advance and then gently reheat it on the stovetop or in the oven. Just be mindful not to overcook it when reheating.
What kind of protein can I substitute if I don’t have the main ingredient?
This recipe is wonderfully adaptable! You can easily substitute chicken thighs, firm tofu, or even a hearty white fish like cod or haddock. Adjust cooking times as necessary for your chosen protein.
Is this recipe suitable for a begin extractner cook?
Definitely! This ‘Little Birdie’ recipe is designed with simplicity in mind. The steps are straightforward, and the ingredients are easy to find, making it an excellent choice for anyone new to the kitchen.
Little Birdie
A delightful and simple recipe, adapted for a wider audience.
Ingredients
-
1 cup all-purpose flour
-
1/2 cup granulated sugar
-
1 teaspoon baking powder
-
1/4 teaspoon salt
-
1/2 cup milk
-
1/4 cup vegetable oil
-
1 large egg
-
1 teaspoon vanilla extract
Instructions
-
Step 1
Preheat your oven to 350°F (175°C). Lightly grease a muffin tin or line with cupcake liners. -
Step 2
In a large bowl, whisk together the flour, sugar, baking powder, and salt. -
Step 3
In a separate bowl, whisk together the milk, vegetable oil, egg, and vanilla extract. -
Step 4
Pour the wet ingredients into the dry ingredients and stir until just combined. Do not overmix. -
Step 5
Divide the batter evenly among the prepared muffin cups, filling each about two-thirds full. -
Step 6
Bake for 18-20 minutes, or until a toothpick inserted into the center of a cupcake comes out clean. -
Step 7
Let cool in the muffin tin for a few minutes before transferring to a wire rack to cool completely.
Important Information
Nutrition Facts (Per Serving)
It is important to consider this information as approximate and not to use it as definitive health advice.
Allergy Information
Please check ingredients for potential allergens and consult a health professional if in doubt.