Easy Strawberry Mousse Recipe- Light & Delicious
Strawberry mousse is an absolute dream, a cloud-like confection that captures the very essence of summer. There’s a reason why this delightful dessert is so universally adored. Its ethereal texture, impossibly light and airy, melts on your tongue, leaving behind a burst of vibrant, sweet strawberry flavor. What truly sets this strawberry mousse apart is its inherent elegance. It’s deceptively simple to make, yet it possesses a sophistication that makes it perfect for special occasions, a romantic dessert for two, or simply as a delightful treat to brighten any day. Imagin extracte the blush pink hue, the gentle wobble, the sheer joy of spooning into such a perfect creation. It’s a testament to how a few well-chosen ingredients can transform into something truly magical.
Strawberry Mousse
There’s something incredibly elegant and surprisingly simple about a good mousse. It feels like a special occasion dessert, yet with a few key ingredients and a little bit of whisking, you can whip up this delightful strawberry mousse right in your own kitchen. This recipe is wonderfully adaptable, allowing you to tailor it to your dietary preferences without sacrificing that luxurious, airy texture we all love. Imagin extracte a cloud of sweet, tangy strawberry goodness, melting in your mouth – that’s exactly what we’re going to create.
This strawberry mousse is perfect for a light dessert after a rich meal, a sophisticated addition to a brunch spread, or simply a sweet treat to brighten your day. It’s also incredibly versatile. While strawberries are the star here, you can experiment with other berries or even a touch of lemon zest for a different flavor profile. The key is to achieve a smooth, creamy base that’s then lightened with whipped cream or its dairy-free alternative, creating that signature airy texture. We’ll be focusing on a method that ensures your mousse is silky smooth and utterly irresistible.
Let’s get started on creating this delightful treat. Gathering your ingredients is the first, and perhaps most important, step to a successful baking or dessert-making endeavor. Having everything measured and ready will make the process flow much more smoothly.
Ingredients:
Creating Your Strawberry Mousse
This recipe is designed to be straightforward, even if you’ve never made mousse before. We’ll break it down into manageable steps, ensuring a perfect outcome every time.
Step 1: Prepare the Strawberries
The first step is to get our beautiful strawberries ready. Wash them thoroughly under cool running water and pat them dry with a paper towel. We want to remove as much excess moisture as possible. Now, hull them by removing the green leafy tops. For this recipe, we’ll be pureeing the strawberries, so cut them into smaller pieces. This will make it easier for your blender or food processor to work its magic. If your strawberries are particularly large, consider cutting them into quarters. If they are smaller, halves might suffice. The goal is to have them in bite-sized pieces for easy blending.
Step 2: Blend the Strawberry Base
Once your strawberries are prepped, it’s time to create a smooth, vibrant puree. Place the chopped strawberries into a blender or food processor. Blend them until they are completely smooth, with no chunks remaining. You’re looking for a silky consistency. If you find it’s too thick to blend easily, you can add a teaspoon or two of water, or even a tablespoon of the yogurt you’ll be using later, to help it along. Once you have a beautiful strawberry puree, set it aside for now. This vibrant base will provide all the wonderful fruity flavor and color for our mousse.
Step 3: Cream the Base Ingredients
Now we move on to creating the creamy foundation for our mousse. In a medium-sized mixing bowl, combine your softened cream cheese (if using) or chilled coconut cream, along with the yogurt. If you’re using cream cheese, ensure it’s at room temperature so it creams beautifully and without lumps. If you’re using coconut cream, make sure it’s well-chilled and scoop out only the thick cream from the top, leaving the water behind in the can. This will help you achieve the right consistency. Beat these ingredients together until they are smooth and well combined. A hand mixer or a stand mixer is ideal for this, but you can also do this vigorously with a whisk.
Step 4: Sweeten and Flavor the Creamy Base
Next, we’ll introduce the sweetness and any optional flavorings. Gradually add the powdered sugar (or your chosen sugar-free alternative) to the cream cheese and yogurt mixture. Beat until everything is thoroughly combined and the mixture is smooth and creamy. If you are using vanilla bean paste, now is the time to add it. The vanilla bean paste adds those lovely little speckles and a richer vanilla flavor than extract. Blend it in until it’s evenly distributed. Taste the mixture at this point and adjust the sweetness if necessary. Remember, the strawberries will add their own natural sweetness, so it’s good to have a balance.
Step 5: Combine and Whip to Perfection
This is where the magic of mousse truly happens. Gently fold the prepared strawberry puree into the sweetened cream cheese (or coconut cream) mixture. Be careful not to overmix at this stage. You want to incorporate the puree without deflating the airy quality of the cream base. Once the strawberry puree is mostly incorporated, it’s time to achieve that signature mousse texture.
If you are using cream cheese and yogurt, you might find the mixture is already quite thick and mousse-like. If you’re using coconut cream, you may need to whip it a bit more to achieve a lighter texture. Some recipes suggest whipping heavy cream separately and folding it in for an even lighter mousse. However, with the cream cheese or coconut cream base, and the yogurt, we’re aiming for a thicker, richer mousse.
If your mixture feels a little dense, you can gently whisk it for a minute or two until it lightens slightly. The key is to be gentle. You are not trying to create stiff peaks like you would with whipped cream, but rather a smooth, airy, and spoonable consistency.
Step 6: Chill and Serve
Once your strawberry mousse has reached your desired consistency, spoon it into individual serving dishes, small glasses, or ramekins. Cover them with plastic wrap, ensuring the plastic wrap touches the surface of the mousse to prevent a skin from forming. Refrigerate for at least 2 to 3 hours, or preferably longer, to allow the mousse to set and the flavors to meld beautifully. The chilling process is crucial for the mousse to firm up and develop its characteristic texture.
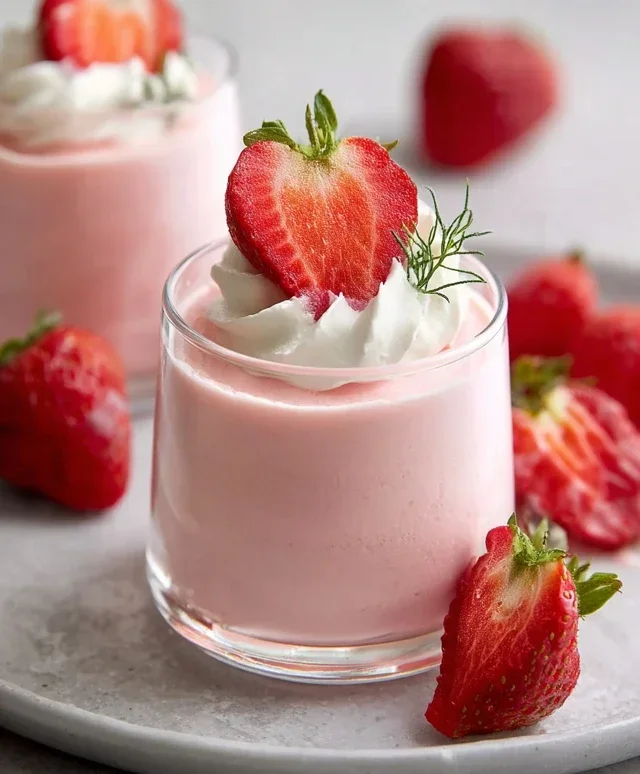
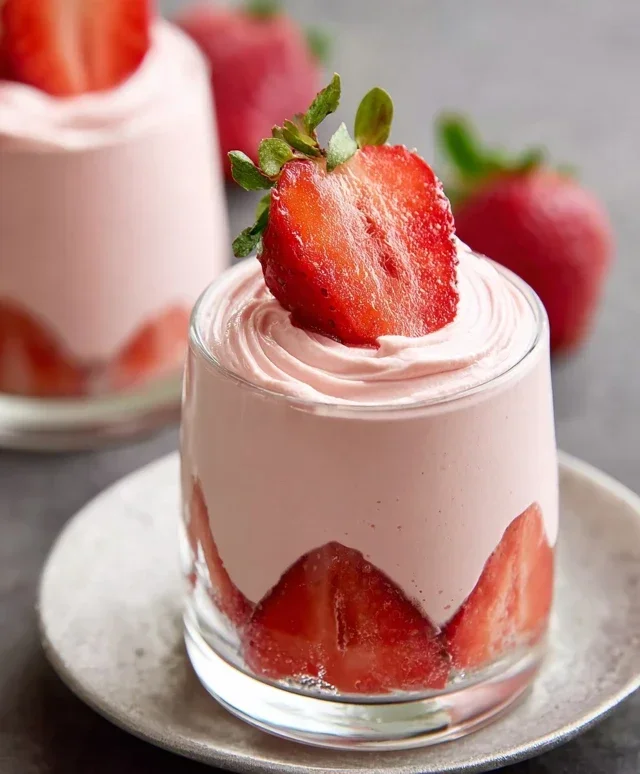
When you’re ready to serve, you can garnish your strawberry mousse with a fresh strawberry, a dollop of whipped cream (dairy or non-dairy), or a sprinkle of mint leaves. The beauty of this mousse is its simplicity, allowing the fresh strawberry flavor to shine through. Enjoy this delightful treat!
Conclusion:
I hope you’re as excited as I am to whip up this delightful Strawberry Mousse! This recipe truly shines because of its simplicity and the incredible burst of fresh strawberry flavor it delivers. It’s a wonderfully light and airy dessert that feels elegant yet is surprisingly easy to make, making it perfect for both casual gatherings and special occasions. The smooth, creamy texture paired with the natural sweetness of ripe strawberries is simply irresistible. I’ve found it to be a guaranteed crowd-pleaser!
Serving this luscious Strawberry Mousse is where your creativity can really take flight. It’s fantastic on its own, chilled to perfection. For an extra touch of indulgence, consider garnishing it with fresh strawberry slices, a sprig of mint, a dollop of whipped cream, or even a sprinkle of toasted slivered almonds for a bit of crunch. It also makes a stunning filling for tarts or a topping for cupcakes. Don’t be afraid to experiment with variations! If fresh strawberries are out of season, a good quality strawberry puree or even some thawed frozen strawberries can work wonders. For a dairy-free option, you can substitute the heavy cream with full-fat coconut milk (chilled overnight) and adjust the sweetness as needed. I truly encourage you to give this recipe a try; I’m confident you’ll fall in love with its refreshing taste and effortless charm.
Frequently Asked Questions:
Can I make this strawberry mousse ahead of time?
Absolutely! This is one of the best things about this recipe. You can prepare the strawberry mousse up to 24 hours in advance. Simply cover it tightly with plastic wrap and refrigerate. The flavors will meld beautifully, and the texture will set perfectly.
What’s the best way to get a light and airy mousse texture?
The key to a light and airy mousse is properly whipping the cream and gently folding it into the strawberry mixture. Ensure your heavy cream is very cold for optimal whipping. When folding, use a spatula and a gentle, upward motion to avoid deflating the whipped cream. This careful incorporation is what creates those lovely air pockets.
Strawberry Mousse
A light and airy strawberry mousse, perfect for a refreshing dessert. This recipe offers dairy and vegan options.
Ingredients
-
8 oz cream cheese or coconut cream
-
4 oz yogurt or additional cream cheese or coconut cream
-
1 cup powdered sugar or sugar free alternative
-
5 medium size strawberries
-
1/4 tsp vanilla bean paste (optional)
Instructions
-
Step 1
Wash and hull the strawberries. Set aside a few for garnish if desired. -
Step 2
In a blender or food processor, combine the cream cheese (or coconut cream), yogurt (or additional cream cheese/coconut cream), and most of the strawberries. Blend until smooth. -
Step 3
Add the powdered sugar (or sugar-free alternative) and vanilla bean paste (if using) to the blender. Process until well combined and the mixture is fluffy. -
Step 4
Taste and adjust sweetness as needed. -
Step 5
Spoon the mousse into individual serving dishes or glasses. -
Step 6
Chill in the refrigerator for at least 30 minutes to allow it to set. Garnish with reserved strawberries before serving.
Important Information
Nutrition Facts (Per Serving)
It is important to consider this information as approximate and not to use it as definitive health advice.
Allergy Information
Please check ingredients for potential allergens and consult a health professional if in doubt.