Easy St. Patrick’s Day Cookies – Festive & Fun Treats
Easy St. Patrick’s Day cookies are the perfect way to inject a little festive fun into your celebration without any of the fuss! As the emerald isle calls and the spirit of St. Paddy’s Day fills the air, what better way to join in than with a batch of delightful, green-tinged treats? These cookies aren’t just simple to make; they’re a guaranteed hit with everyone, from seasoned bakers to absolute begin extractners. We all love a sweet indulgence, and when it’s tied to a holiday, it just feels extra special, doesn’t it? What makes these Easy St. Patrick’s Day cookies so wonderful is their adaptability. Whether you prefer a classic sugar cookie base or a hint of mint, the vibrant green color is the star, instantly evoking the luck of the Irish. Get ready to bake up some smiles and maybe even find your own pot of gold at the end of the rainbow!
Easy St. Patrick’s Day Cookies
Get ready to bring a splash of emerald joy to your St. Patrick’s Day celebrations with these incredibly easy and surprisingly delightful cookies! Forget complicated doughs and tedious shaping. These green beauties come together in a flash, making them perfect for a last-minute festive treat or a fun baking activity with the kids. They boast a soft, cake-like texture and a subtly sweet flavor, making them a crowd-pleaser for all ages. The vibrant green color is truly the star of the show, instantly evoking the spirit of the holiday. So, let’s dive into how we can whip up a batch of these cheerful cookies and add a touch of luck to your day!
Ingredients:
Making the Dough: A Foundation of Fun
The beauty of these St. Patrick’s Day cookies lies in their simplicity. We’re using a cake mix as our base, which eliminates the need for measuring out individual dry ingredients like flour, baking soda, and salt. This is a game-changer for busy bakers and guarantees a tender crum extractb.
Step-by-Step Cookie Creation
1. Combine the Wet Ingredients and Cake Mix: In a medium-sized mixing bowl, crack your two large eggs. Add the 1/3 cup of vegetable oil to the eggs. Now, grab your box of white cake mix. You’ll need about 3 cups of the mix, so if your box is slightly different, just eyeball it to ensure you have roughly this amount. Pour the cake mix into the bowl with the eggs and oil. At this point, you’ll want to start mixing. A spatula or wooden spoon works well for the initial stages, as the mixture will be quite stiff. Continue mixing until the ingredients are just combined and there are no dry streaks of cake mix remaining. Don’t overmix; we want to keep that cake-like tenderness.
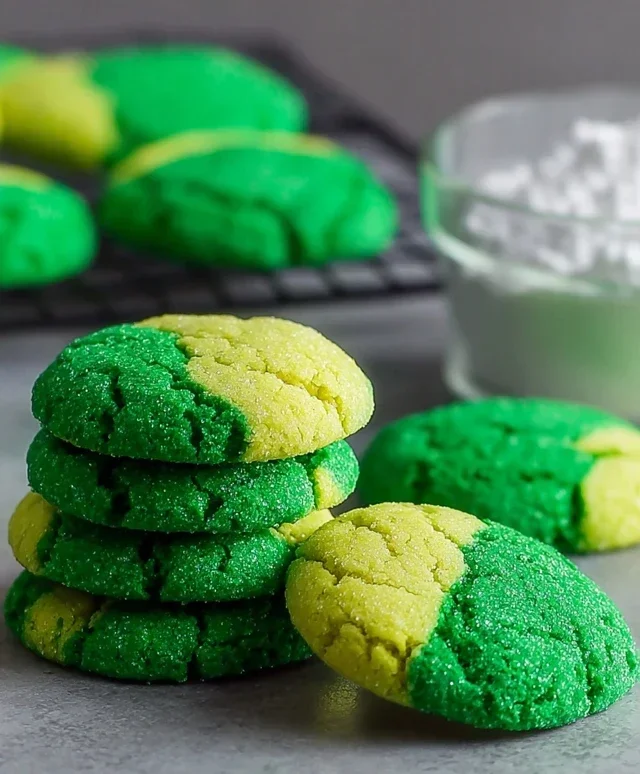
2. Achieve the Perfect St. Patrick’s Day Green: This is where the magic happens and our cookies get their festive hue! Take your 1/4 teaspoon of Kelly green gel food coloring. Gel food coloring is preferred over liquid because it’s much more concentrated, meaning you’ll need less to achieve a vibrant color, and it won’t add extra moisture that could alter the cookie’s texture. Add the gel coloring to your dough. Now, mix again. You’ll need to work this coloring in thoroughly to ensure an even green throughout the dough. It might take a minute or two of diligent mixing, but the payoff is a beautiful, uniform shade of green that screams St. Patrick’s Day. If you desire an even deeper green, you can add a tiny bit more gel coloring, but do so incrementally to avoid overdoing it.
3. Forming the Cookie Balls: Once your dough is a lovely, consistent green, it’s time to start forming the cookies. We’re going for simple, delightful little spheres. You can use a tablespoon or a small cookie scoop to portion out the dough. Aim for roughly 1-inch balls. Roll each portion of dough gently between your palms to create smooth balls. As you form them, place them about 2 inches apart on an ungreased baking sheet. Don’t worry if they aren’t perfectly round; a slightly rustic look is charming for these simple cookies. The dough will be slightly sticky, so if you find it difficult to handle, you can lightly dampen your hands with water.
4. Baking to Golden Perfection (or Green Perfection!): Preheat your oven to 350°F (175°C). Place your baking sheets with the cookie dough balls into the preheated oven. We’re going to bake these for about 9 to 12 minutes. The exact time will depend on your oven and the size of your cookies. You’re looking for the edges to be lightly golden and the centers to appear set. Because they are cake-based, they won’t spread as much as traditional sugar cookies, and the green color will help mask traditional browning. Keep a close eye on them towards the end of the baking time to prevent over-baking, which can make them dry.
5. The Sweet Finishing Touch: A Sugary Shower: Once the cookies are out of the oven and still warm, it’s time for their final flourish. In a small bowl, combine the 3 tablespoons of granulated sugar and the 6 tablespoons of powdered sugar. This mixture will give our cookies a delicate, sweet coating that adds a lovely crunch and extra sweetness. While the cookies are still warm (but not piping hot), gently roll each cookie in the sugar mixture until it’s evenly coated. The warmth of the cookie will help the sugar adhere. Place the coated cookies back on the baking sheet or a wire rack to cool completely. As they cool, the sugar coating will set beautifully.
These easy St. Patrick’s Day cookies are not only a joy to make but also a delight to eat. Their vibrant color and tender texture make them a festive and fuss-free addition to any St. Paddy’s Day gathering. Enjoy the luck of the Irish, baked right into every bite!
Conclusion:
I hope you’ve enjoyed learning how to make these Easy St. Patrick’s Day Cookies! They truly are a fantastic recipe because they require minimal effort and deliver maximum festive cheer. The simple dough comes together quickly, and the decorating options are endless, making them perfect for bakers of all skill levels. Whether you’re looking for a fun activity to do with kids, a delightful treat to share with friends, or just a way to add a touch of Irish luck to your day, these cookies are a guaranteed hit. They’re wonderfully versatile; consider them a blank canvas for your creativity!
For serving suggestions, these cookies are delightful on their own with a glass of milk, but they also make a charming addition to any St. Patrick’s Day dessert platter. You can also bag them up with a festive ribbon for a thoughtful homemade gift. Want to switch things up? Try adding a hint of mint extract to the dough for an extra burst of flavor, or experiment with different shades of green food coloring for a unique look. Don’t be afraid to get creative with sprinkles, edible glitter, or even piped icing! I highly encourage you to give this recipe a try – you won’t regret the sweet, festive outcome!
Frequently Asked Questions:
Can I make the dough ahead of time?
Absolutely! The dough for these Easy St. Patrick’s Day Cookies can be made up to 2 days in advance and stored, tightly wrapped, in the refrigerator. Just let it sit at room temperature for about 15-20 minutes before rolling and cutting to make it easier to handle.
What are some other decorating ideas?
Beyond green icing and sprinkles, you could use cookie cutters in fun shapes like sbeef hamrocks or pots of gold. You could also try a simple drizzle of white chocolate with green colored sanding sugar for a sophisticated yet easy finish.
Easy St. Patrick’s Day Cookies
Simple and festive green cookies perfect for St. Patrick’s Day celebrations.
Ingredients
-
1 box (15.25 oz) white cake mix (about 3 cups)
-
2 large eggs
-
1/3 cup vegetable oil
-
1/4 teaspoon Kelly green gel food coloring
-
3 tablespoons granulated sugar
-
6 tablespoons powdered sugar
Instructions
-
Step 1
Preheat your oven to 350°F (175°C) and line baking sheets with parchment paper. -
Step 2
In a large bowl, combine the white cake mix, eggs, and vegetable oil. Mix until just combined. -
Step 3
Add the Kelly green gel food coloring to the dough and mix until evenly distributed. The dough will be thick. -
Step 4
Roll the dough into 1-inch balls. In a small bowl, combine the granulated sugar. Roll each dough ball in the granulated sugar, then place them onto the prepared baking sheets about 2 inches apart. -
Step 5
Bake for 8-10 minutes, or until the edges are lightly golden and the centers are set. -
Step 6
Let the cookies cool on the baking sheets for a few minutes before transferring them to a wire rack to cool completely. Once cooled, dust with powdered sugar.
Important Information
Nutrition Facts (Per Serving)
It is important to consider this information as approximate and not to use it as definitive health advice.
Allergy Information
Please check ingredients for potential allergens and consult a health professional if in doubt.